06-18-2024 - Technical Guides
5 Tips to Master the Sony BURANO in Adobe Premiere Pro
By: Yaroslav Altunin
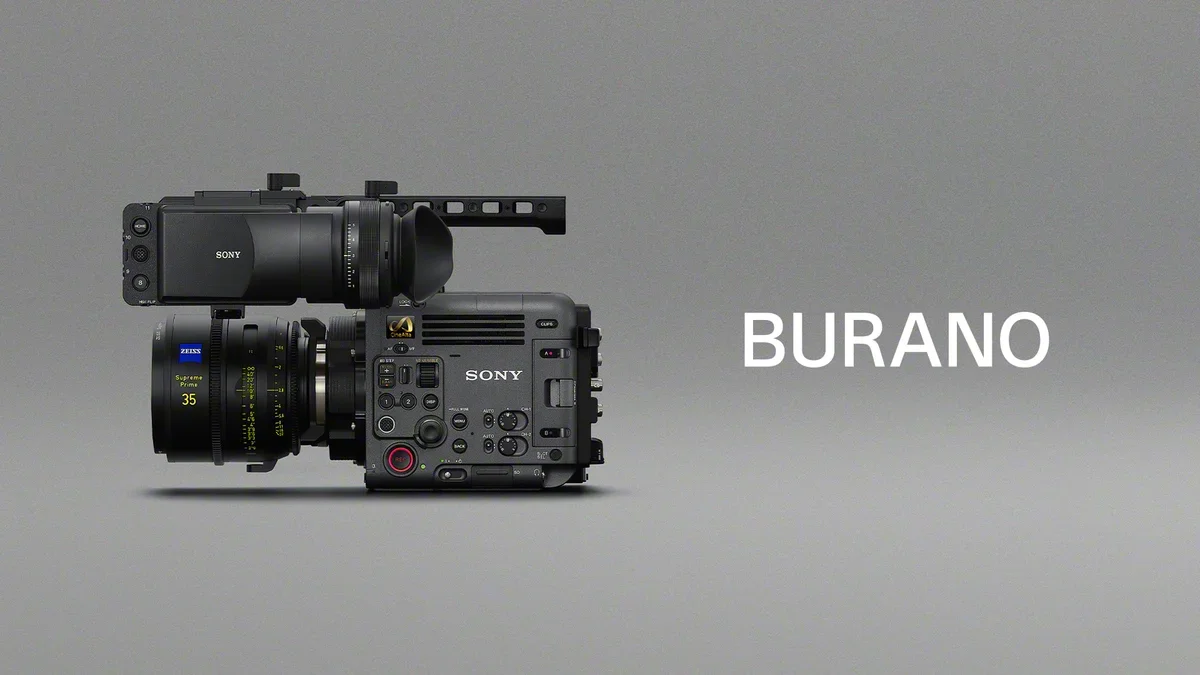
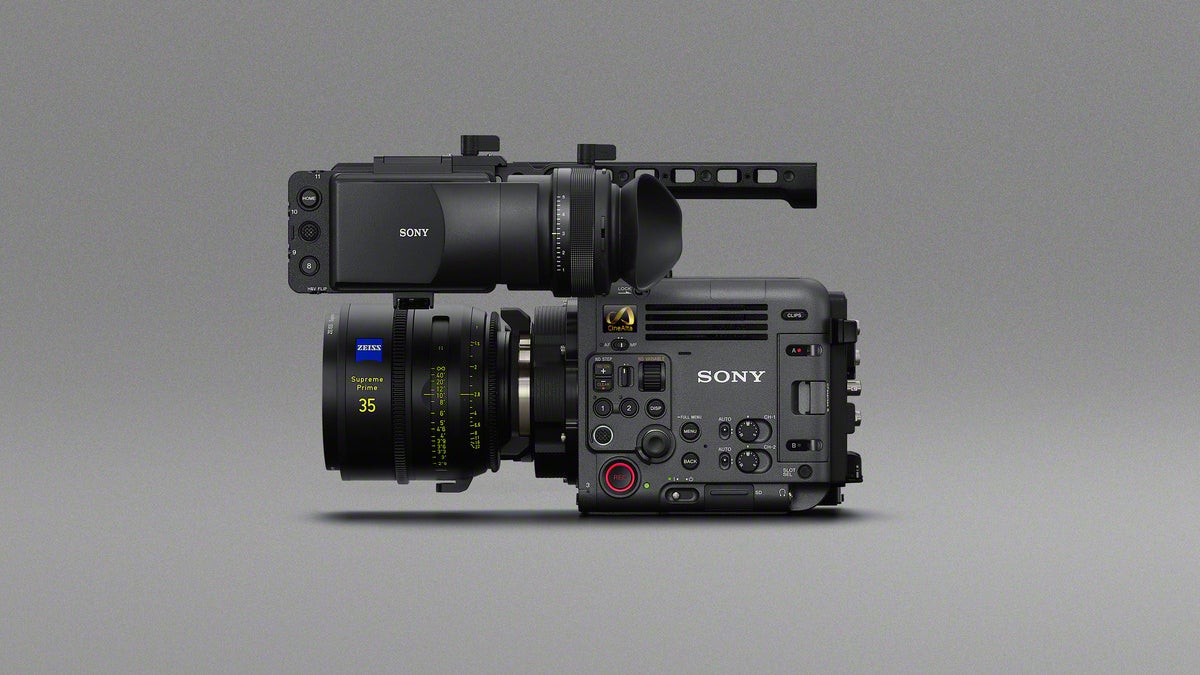
The Sony BURANO cinema camera is all about versatility. Sitting between the Sony VENICE and the FX line, it aims to be a perfect middle ground for working on different types of projects.
You now have the efficiency of XAVC and the power of 16-bit X-OCN LT RAW in a single camera. But when working with these two codecs in a non-linear editing application, such as Premiere Pro, there are several things that need to be considered. This is why Adobe works closely with manufacturers like Sony to support these new hardware and software options early on, giving you quick access to the tools you need on set and in the edit.
We spoke with Fergus Hammond, a principal Product Manager on the Adobe video team, who shared his six workflow tips for editing footage shot on the Sony BURANO.
Hammond will also be joining a team of seasoned experts for Mastering Sony’s BURANO Digital Cinema Camera & Adobe Premiere Pro: Tips & Tricks Livestream. Here, they will share an extended look at how to refine your workflow for this new camera.
1. X-OCN LT vs XAVC - Adobe's BURANO Workflow
When importing your XAVC or X-OCN footage into Adobe, the two formats are handled a bit differently, even if they are technically packaged in the same .MXF container. This is because the underlying file structure recorded by the camera is different.
When importing footage into Premiere Pro, you have three different options:
· Click and drag footage in Premiere Pro
· Click File, then Import
· Or use Import Mode
The Sony BURANO stores all XAVC files in one folder, making them easy to import. The imported XAVC footage will be organized in its own segmented folder when using any of the three methods above.
However, this changes when recording X-OCN LT on the BURANO.
If you import X-OCN footage by clicking on File>Import>Navigate in Finder to Footage>Click Import, all of your footage will be imported into separate folders for each clip. This is not a good way to organize your footage and will create more prep work.
Clicking and dragging your footage into Premiere Pro produces the same results.
Hammond explained that because Sony cameras record each X-OCN file in their own folder, Premiere Pro will dutifully import each of those folders as a separate bin.
In order to import footage more efficiently, Hammond suggests that you use IMPORT MODE instead of the path of going to File and Import.
Premiere Pro is separated into three modes:
- Import: where you ingest your footage.
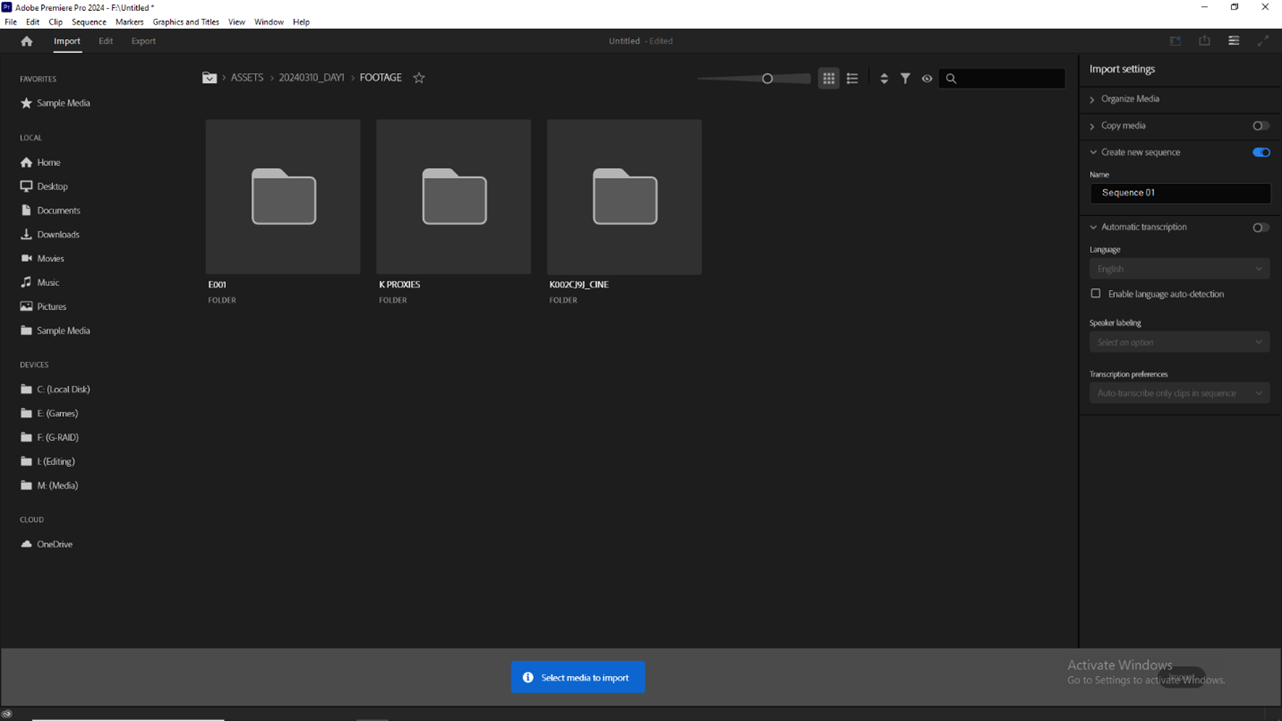
- Edit: where you edit your Project.
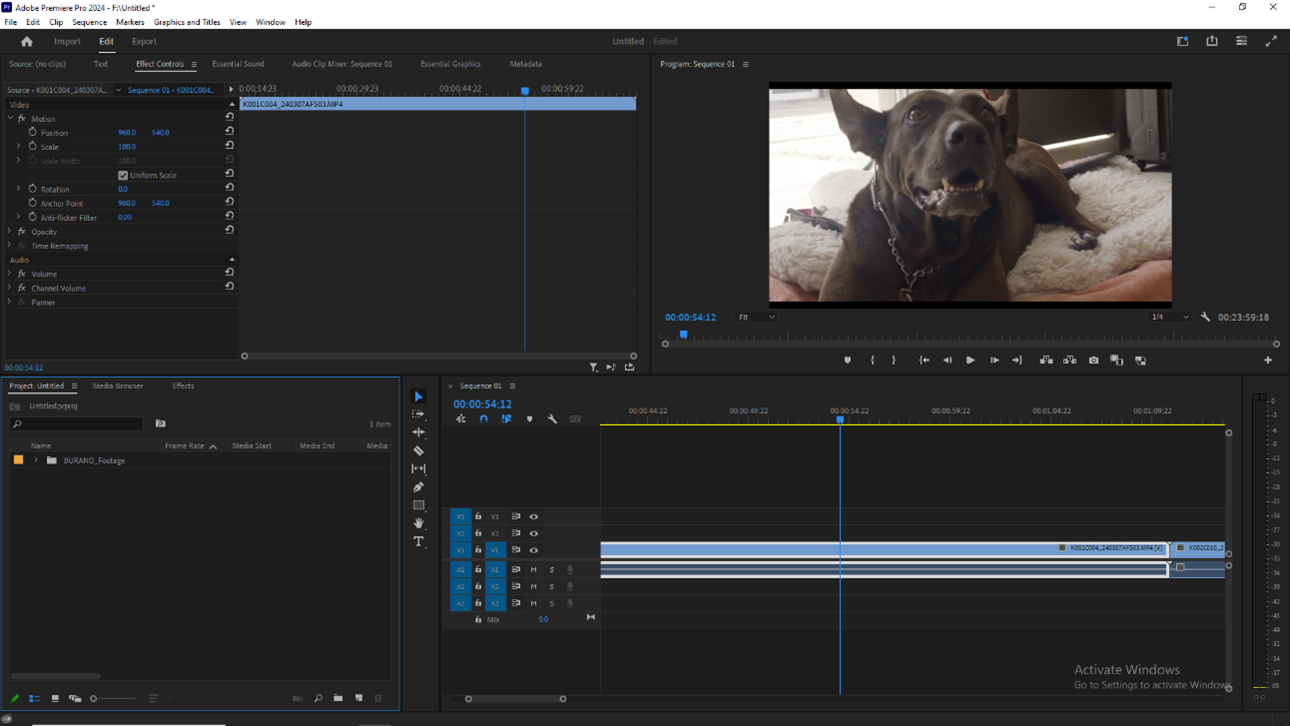
- Export: where deliverables are created.
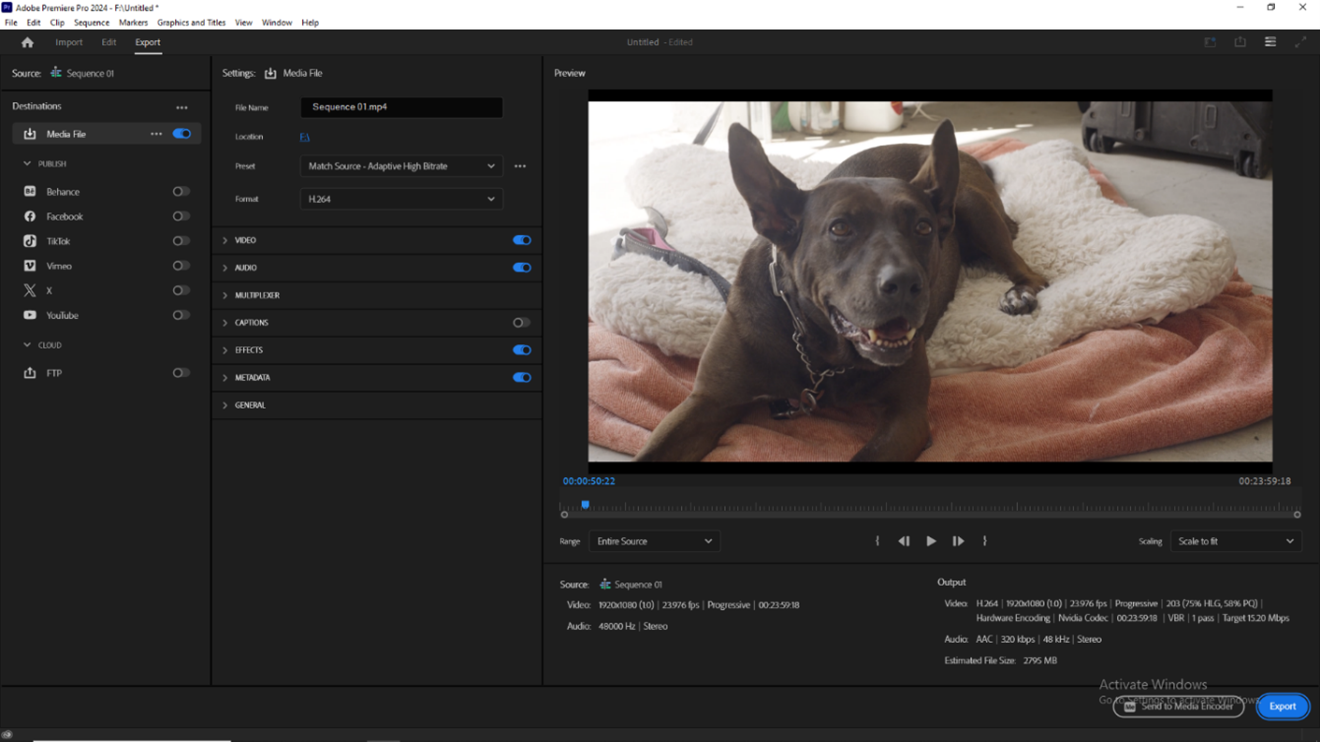
When using Import Mode, you can navigate your file structure within Premiere Pro and import X-OCN footage without leaving the NLE. This approach will organize all the X-OCN clips into one bin.
2. Managing High-Resolution Footage: Filming with Tight Turn Arounds
With the versatility of the BURANO, you might find yourself shooting projects with tight turnarounds. In these cases, you might not have time for a proxy workflow. The Adobe team shared that more customers are starting to use their original camera files directly in Premiere Pro.
With Premiere Pro, you can cut the original 8K X-OCN by reducing the playback resolution. This allows you to play your footage at a reduced resolution without dropping frames. When paused, the footage will revert to its full resolution for preview.
To do this, go to your Program Viewer window. In the bottom right corner of this window, you will see a dropdown menu that says Full. When clicking on this menu, you will get several options to reduce the playback resolution of your footage, either by 1/2, 1/4, 1/8, or 1/16. Editors can stay in the X-OCN codec, cut and color their project at a reduced playback resolution, and quickly deliver a final edit.
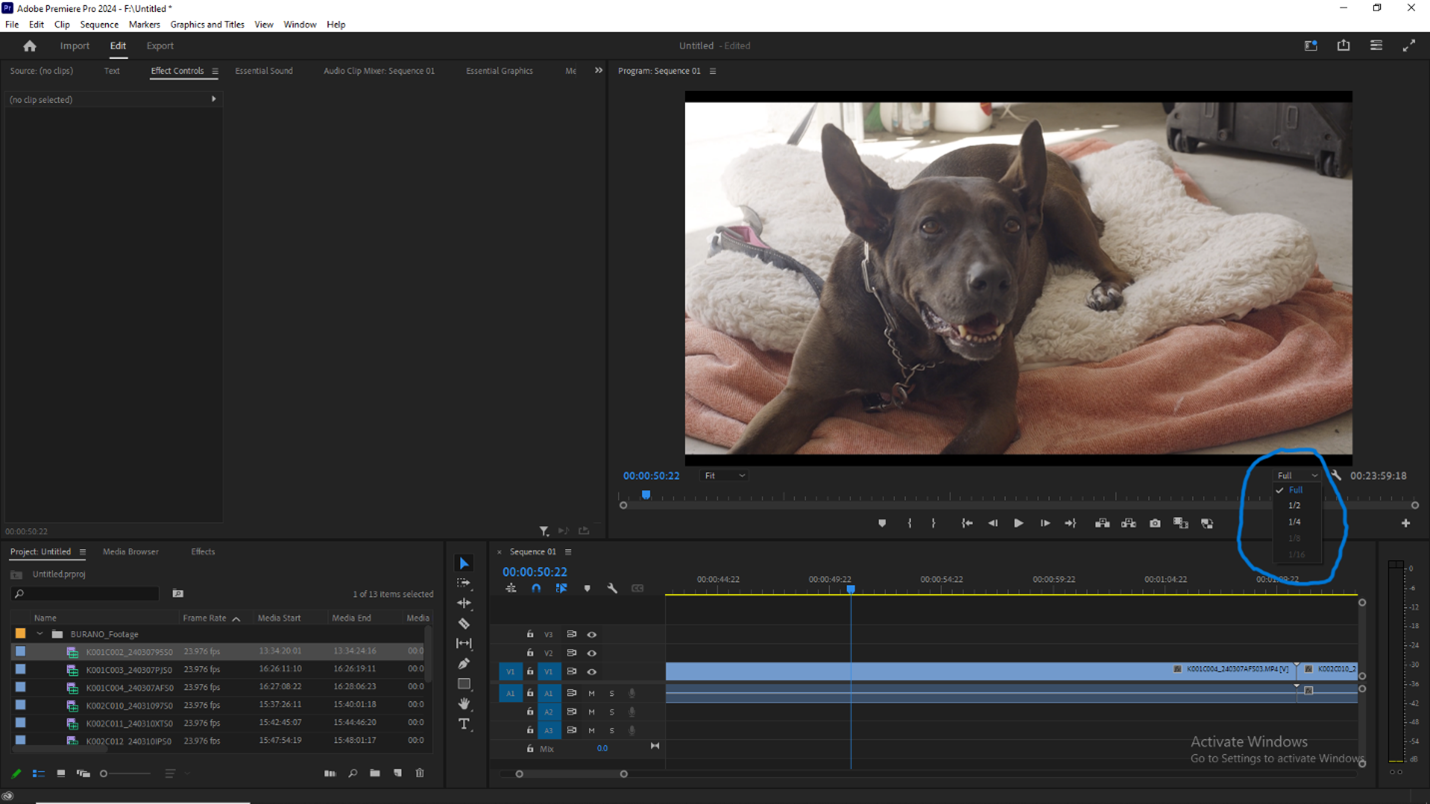
"On most modern computers, particularly if you choose this half-resolution option," Hammond said," it's visually almost indistinguishable from full resolution during playback."
Because X-OCN is a compressed RAW format, file sizes become more manageable, especially with the small file size of the 16-bit X-OCN LT format that the BURANO records. Paired with adjustable playback resolution in Premiere Pro, you are able to edit the original raw files. This increases efficiency and reduces the need to generate extra proxy files that would also need to be organized and managed.
"With X-OCN, when you switch from full to half, we're decoding that X-OCN file at half resolution," Hammond explained. "For most customers on modern computers, they'll be able to play back X-OCN smoothly without any drop frames at either 1/2 or 1/4 resolution."
However, Hammond states that if you’re working with XAVC, you may not need to reduce your playback resolution. In Version 24.4 or above of Adobe video applications, XAVC files from the BURANO are hardware accelerated. This is where Premiere Pro uses your computer’s GPU to decode your footage, giving you smooth playback without putting unnecessary stress on your CPU.
If you’re working on an older computer, it might be best to create proxy files for editing. Using ProRes 422 Proxy, which is highly compressed, will reduce the strain on slower computers. Thankfully, Premiere Pro gives you the choice of which approach is best for your project.
"Our goal is to make sure that we're supporting a dailies workflow, but we're not forcing customers to use proxies for performance reasons," Hammond said.
3. Sony BURANO: When Should You Use a Proxy Workflow?
A proxy workflow can be beneficial for several reasons:
1. Creating low-res media that can be easily shared across your production team.
2. You're burning in timecode or doing quick color correction.
3. The production may have security reasons for not wanting the original camera files.
While you may not need low-res proxy files to edit your project, sharing original X-OCN files isn't the best approach for everyone because you may not have the necessary hardware to view X-OCN files. Even when you record your footage in XAVC, it might be best to produce proxy files in a different codec, such as H.264, which is more compatible with a wide range of devices.
Hammond recommends that creatives working on narrative projects review the Adobe Long Form and Episodic Workflow Guide.
4. Sony BURANO: Managing Your Audio Between Codecs
While your image will be the most reviewed part of your workflow, you must also keep audio in mind. The Sony BURANO records 8 audio channels when using XAVC and only four audio channels in X-OCN.
This is important to consider when making proxies using Premiere Pro's Proxy tool, as certain proxy containers may be incompatible with multi-channel media files.
To create proxy files in Premiere Pro, you can right-click on your footage in the Media Viewer, then navigate to Proxy, and click Create Proxies.
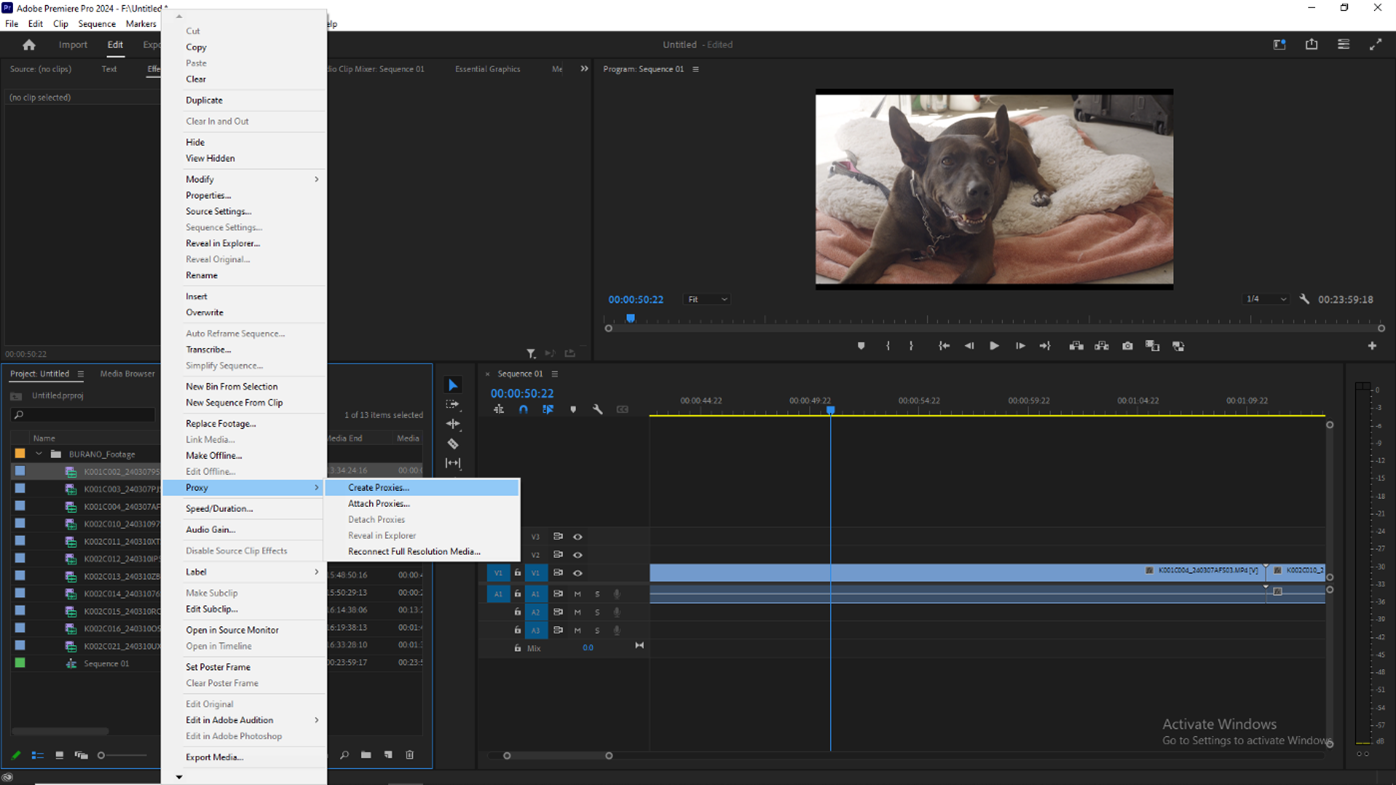
For most projects, using the ProRes Proxy option will be the best approach. But in some situations, making an H.264 proxy file could be more beneficial as it'll be a smaller file size.
However, an H.264 MP4 file can only hold two audio channels, so you will receive an error message when using this option to create proxies. If you recorded footage on the BURANO with more than two audio channels and you need to use H.264 for your proxies, the H.264 QuickTime option will meet your needs, as it will be able to hold all the audio channels.
While this is a niche use case, this is something to consider when thinking about audio since the BURANO is set up to record the max audio channels per codec.
5. Sony BURANO: Understanding Your LUT Workflow
When working in a traditional LUT-based workflow, Premiere Pro will recognize the color space of imported BURANO footage shot in XAVC. But for X-OCN, you’ll have to input your LUT settings manually. If you also have a custom creative LUT or if you used a Rec.709 LUT to monitor your footage on set, Premiere Pro won't apply this LUT when you import your footage, even if it was included on the media card.
To add LUTs into Premiere, the Looks and LUTs document created by Adobe offers a quick guide on how to install them on your Mac or Windows Workstation.
Once the chosen LUT is installed, you can use the Lumetri Panel to apply them to their footage.
There are three places in Lumetri where LUTs can be applied, the first two apply just to the clip in the timeline, the third applies it to an entire source clip:
· Lumetri Color > Basic Correction > Input LUT
· Lumetri Color > Creative > Look Menu
· Lumetri Settings > Source Clip > Input LUT
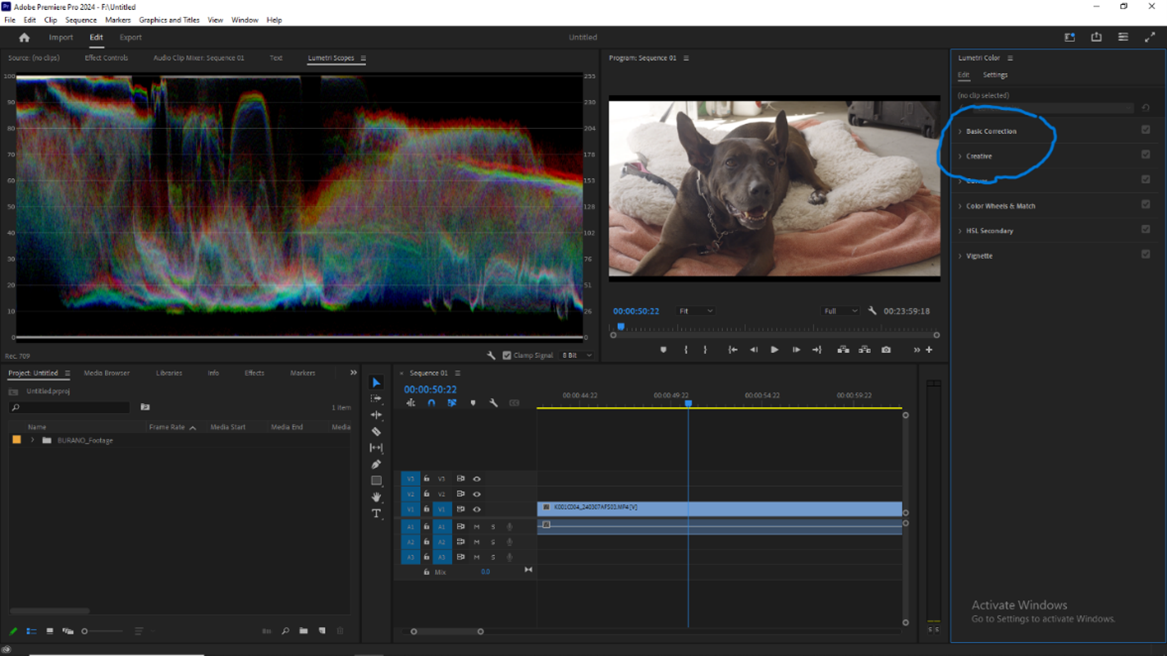
Which menu you use can drastically affect your footage during your workflow.
Lumetri Color > Basic Correction > Input LUT
When using the Basic Correction menu to apply your LUT, it is applied to your clip at the beginning of your image pipeline. Any corrections made to this footage will happen after the LUT. This means your footage will be in a reduced color space and can clip highlights or shadows.
Lumetri Color > Creative > Look Pull Down Menu
A more flexible approach is called “coloring under a LUT.” You do this by applying your LUT to a clip in the Creative Look Menu. This will apply the LUT at the end of your image pipeline, after any corrections or adjustments made in the controls available in the Lumetri Edit Menu.
Lumetri Settings > Source Clip > Input LUT
A third option is to assign a LUT to the source clip in the Lumetri Settings panel. This will apply a LUT to the source clip, not just the instance of it in the timeline. This is a powerful way to quickly transform an entire reel from S-Log to Rec 709, or to apply a LUT from production.
The power of a Source Clip Input LUT is that it can quickly give you a corrected and pleasing image that can easily be removed when it comes time to do a final color grade.
If you need a more unified image pipeline, Adobe will be releasing an update in late 2024 that will allow creatives to utilize X-OCN LT shot on the Sony BURANO to work in a color-managed workflow.
6. Best Practices Working with Multichannel Audio
The Sony BURANO records up to 8K resolution with multichannel audio, while also recording Proxy files. While filming, if you are using booms, lavs, or shotgun mics, you will always be dealing with multichannel audio. Because the proxy files only record stereo audio, here are some best practices when working with original camera file (OCF) multichannel audio and Proxy stereo audio files in Premiere Pro.
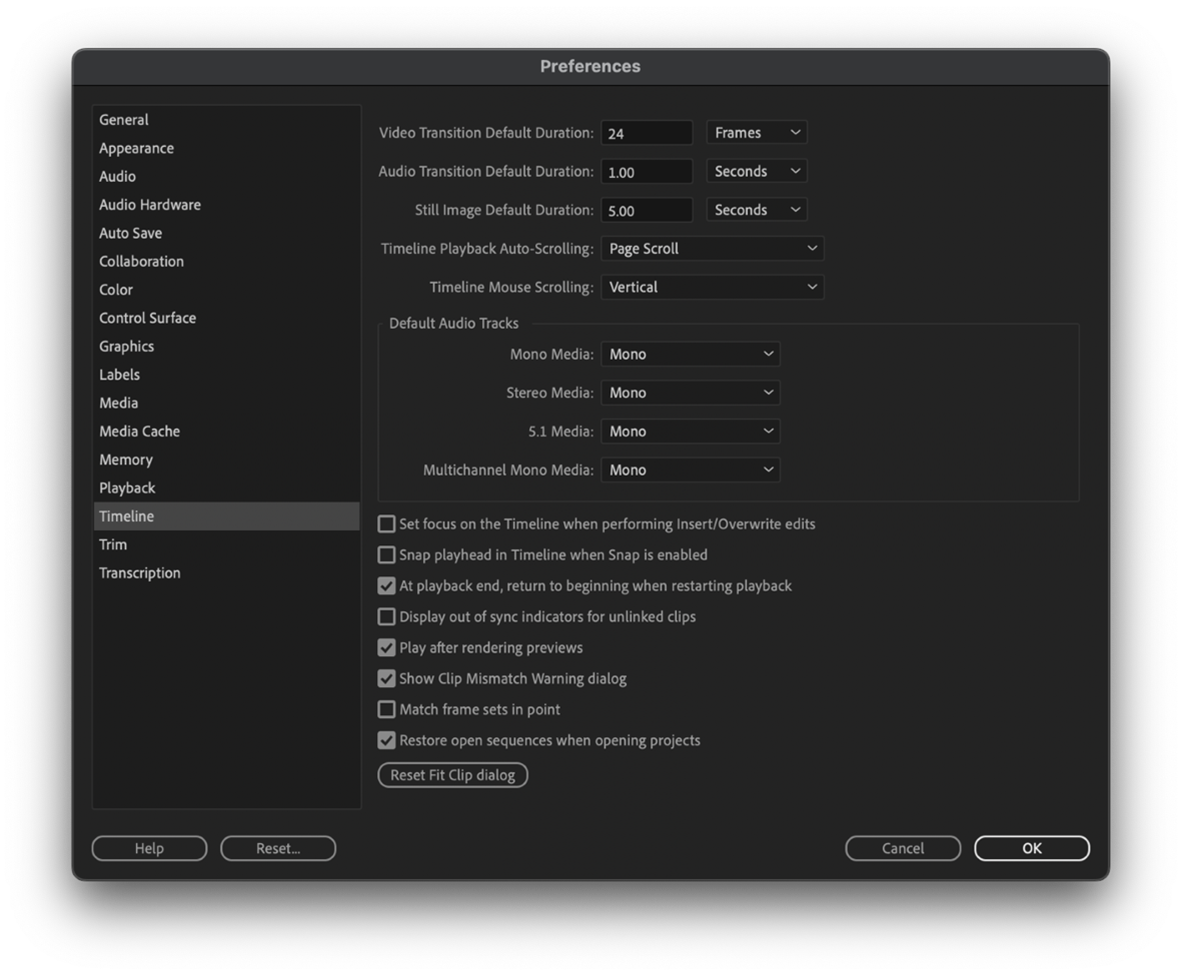
In Premiere Pro Timeline Preferences, it’s best to set your audio channels to mono. This will allow Premiere Pro to recognize each track as its own individual channel.
Proxy files are smaller and easier to transfer, making it faster to get started editing. When you are finished shooting or are dealing with Final delivery you will want to relink your proxy files to the OCF.
Here are three simple steps to relink to your high-resolution media:
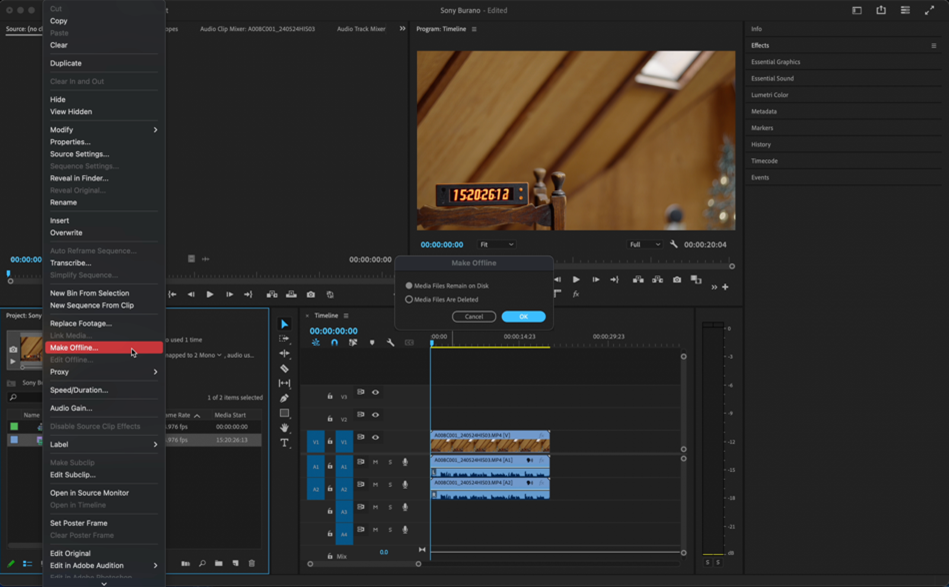
1. First, right click on the files in the project window and select Make Offline, then select Media Files Remain On Disk.
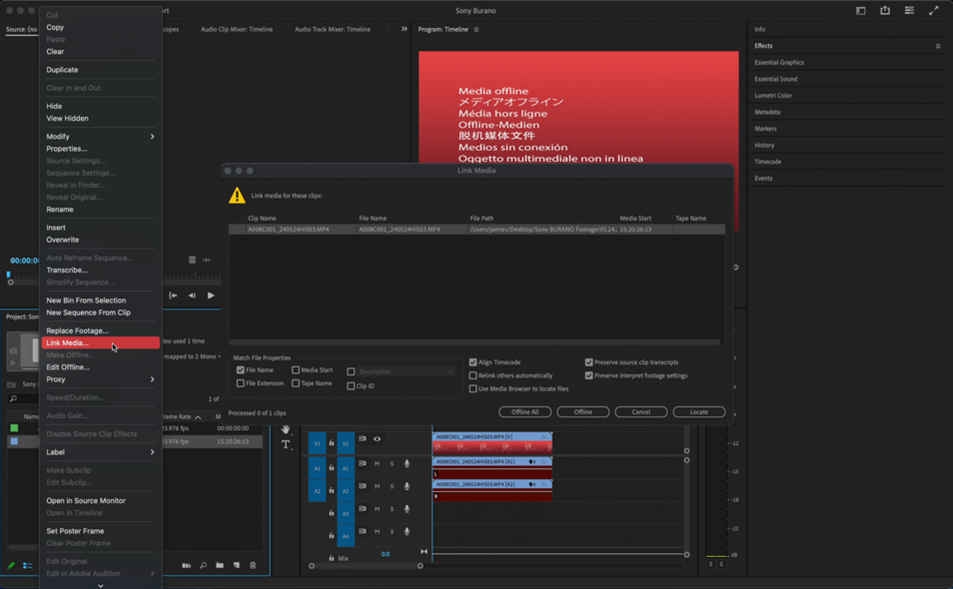
2. Right click them again and select Link Media, make sure Match File Properties has File Name and Align Timecode Selected.
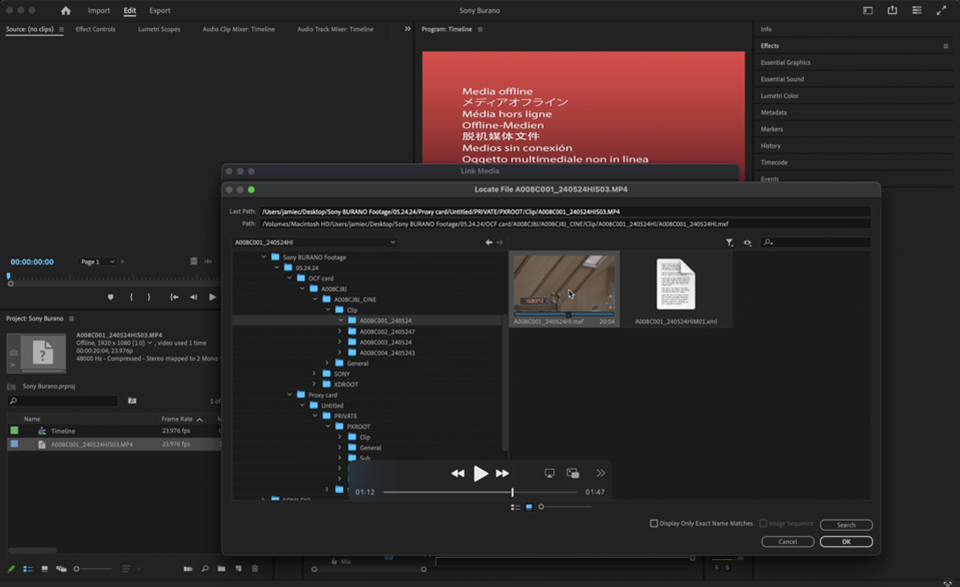
3. Finally, locate your OCF and select OK. Now your files are relinked to the OCF.
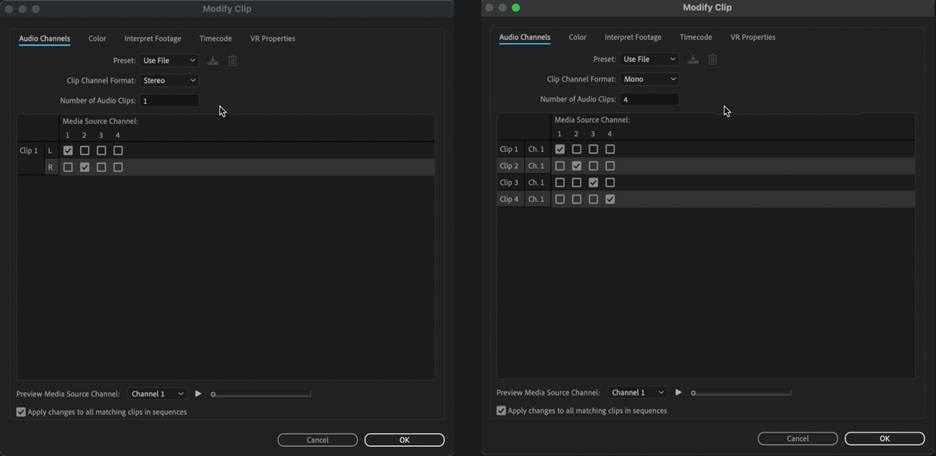
If you have any problems relinking your multichannel audio from your OCF, you can always right click on a media clip, select Modify, and select Audio Channels.
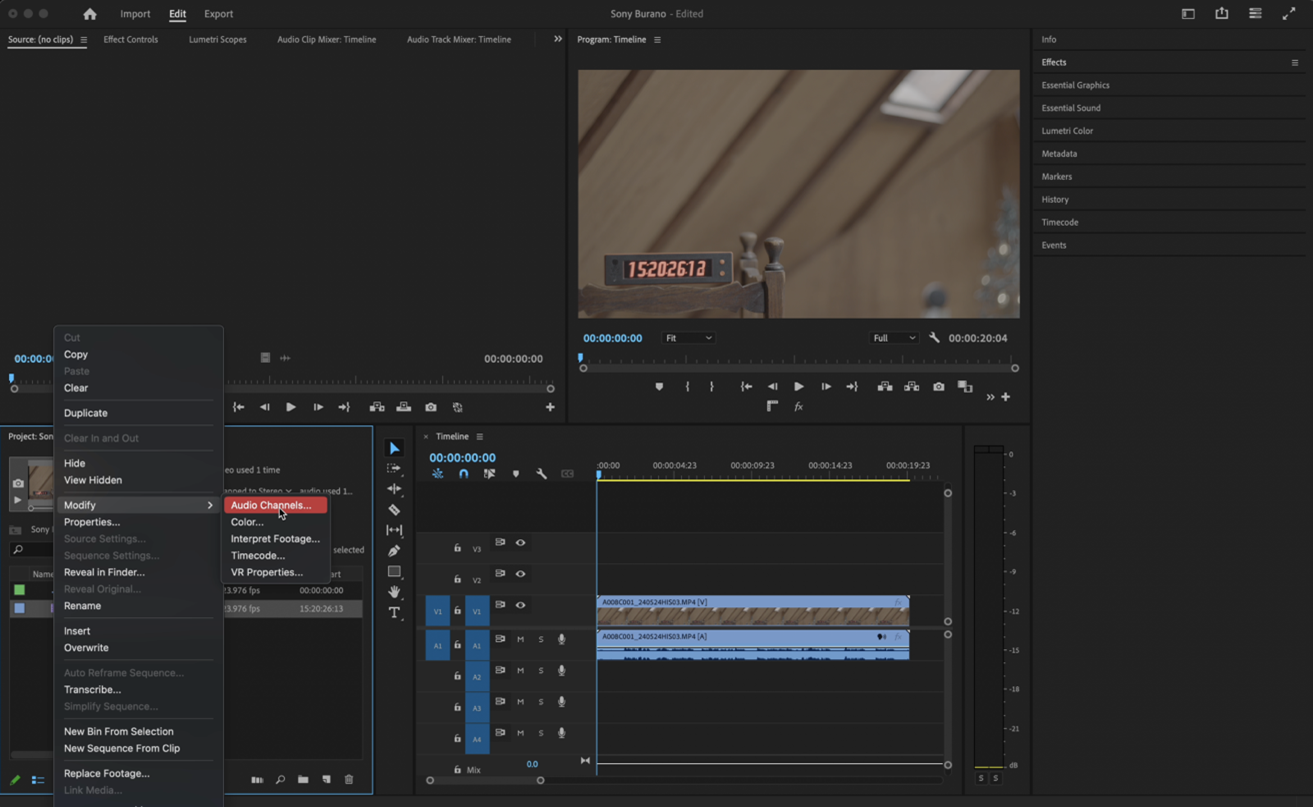
Set Clip Channel Format: Mono and Preset: Use File. Select OK.
Mastering Your Workflow
As the new addition to the Sony cinema line, the BURANO puts efficiency and power into the hands of creatives. With the ability to record XAVC for fast-paced projects and X-OCN LT for lightweight RAW, it’s a camera that can live in many different production environments.
Thanks to Adobe’s quick support for new production tools, editing XAVC and X-OCN within Premiere Pro is now easier than ever. We hope the above tips can help you start thinking creatively about your projects instead of trying to understand the technical side of things.
