08-03-2023 - Gear
How to Unlock Your Camera’s Full Potential By Mastering the FX3/FX30 Menus, Part 2
By: Oakley Anderson-Moore
In Part 1 of this primer, we went over some of the most important FX3 and FX30 settings conveniently located in the cascading Main Menu.
What about what’s not in those menus?
Not to mention, what if you want to get to these settings without having to open the Main Menu at all?
Welcome to Part 2!
In Part 2, we go over important customizable settings in both the Custom Buttons and the Function (Fn) menu. And for anything not in those two realms, we’ll go over how to create shortcuts in the My Menu.
What we go over below for Part 2 at a glance:
-
Using Custom Buttons
-
Changing Custom Buttons
-
Using the Function (Fn) Menu
-
Bringing Deep Menu Settings into My Menu
-
Cheat Sheet for Popular Customizations

Using Custom Buttons
By default, each custom button on the FX3 comes configured to some of the most common settings, so you reach what you need with one press.
However, if any of these buttons are not set to something useful for your style of shooting, just scroll to the bottom of this section for directions on how to configure them into something else.

Exposure
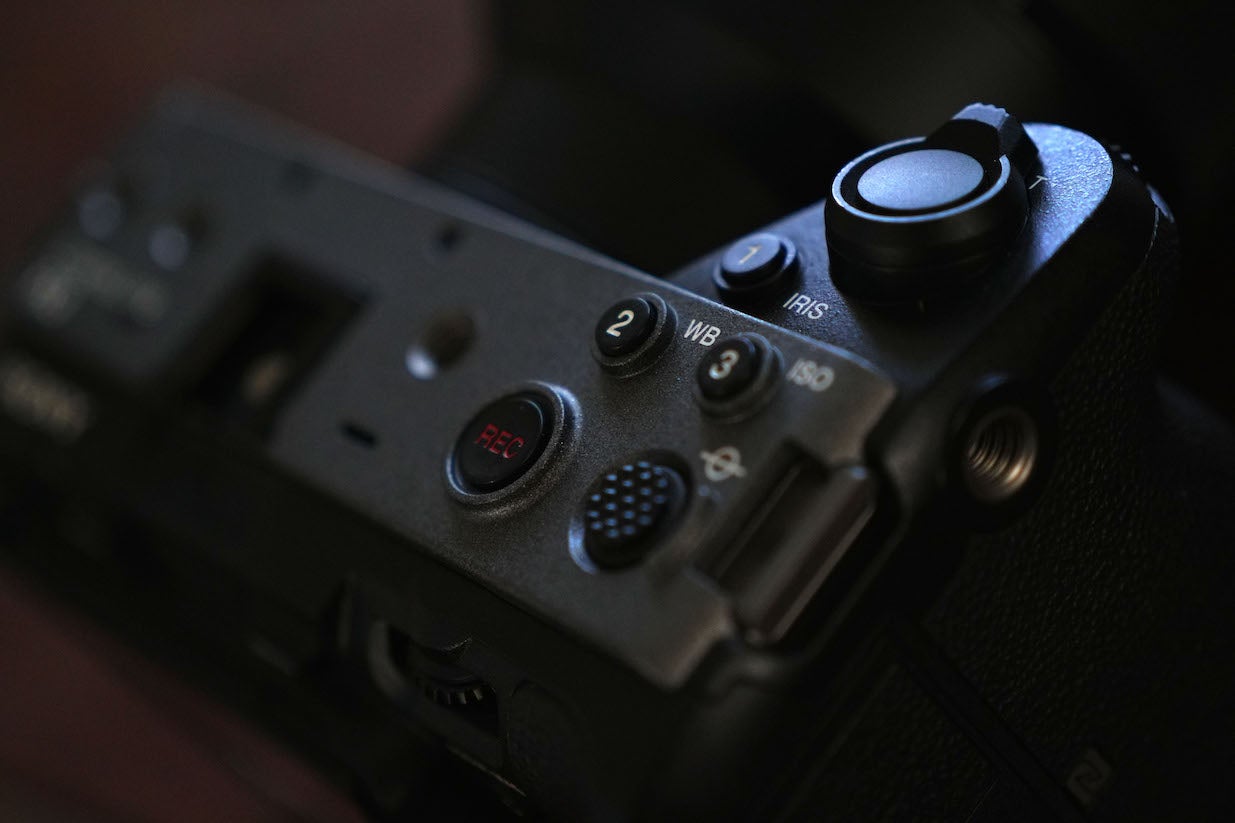
In Part 1, we started with the all-important exposure settings in the Main Menu. But settings like aperture and shutter speed are just so important, you want to be able to access them without having to stop and navigate a menu. For this reason, Sony engineers made every exposure setting its own physical button.
IRIS (Custom Button 1)
Pushing the IRIS button either locks or unlocks the ability to control the aperture. When the IRIS is unlocked, you turn the camera’s Front Dial to open or close the aperture.
Note: Holding down the IRIS button for a few seconds, or “longpressing” it allows you to switch between Manual and Auto IRIS.

Shutter Speed (Bottom of Control Wheel)
Similar to the IRIS button, the Shutter button either locks or unlocks the ability to control the Shutter. (And again, long pressing it will let you change between Auto and Manual Shutter.) When unlocked, you turn the Control Wheel dial to change Shutter Speed.
What’s the Control Wheel? This little guy.

ISO (Custom Button 3)
If you are in Log Shooting Mode with Flexible ISO, or Log Shooting Mode is OFF, pushing the ISO button either locks or unlocks the ability to change the ISO. When unlocked, you turn the camera’s Back Dial to scroll through different ISO settings.
Note: If you are in Cine EI or Cine EI Quick, you are not able to use the ISO button to change the ISO.
Zebra (Left side of Control Wheel)
Pushing the Zebra button lets you turn Zebra ON or OFF.
Focus & Color
There are three quick focus setting buttons:
Peaking On/Off (Right side of Control Wheel)
Focus Magnification (Custom Button 5)
Focus Area (Multi-Slc Center Btn)
WB (Custom Button 2)
Pressing the WB button pulls up the White Balance menu on screen, and lets you select your preferred color temperature setting.
Display & Record
There are two ways that come programmed default to record: on the top of the camera on the MOVIE Button with the red letters that read REC, as well as a convenient lower front Record (Custom Button 6).
Toggling through the Display Button (Top of Control Wheel) you can change the options for what is displayed on your LCD screen. And as you’ve surely figured out, the Trash Can Icon Button(Custom Button 4) is the Delete button that lets you delete a clip in Playback mode.
Changing Custom Buttons
Can you operate these buttons beyond the defaults? You guessed it, that’s why they’re called custom! Here is a look at all the buttons that are customizable. You can change pretty much everything except for the always reliable Playback button.

These are the Sony names for each button so you’ll know which one to pick in camera:
- Custom Button 2
- Custom Button 3
- Custom Button 1
- Custom Button 6
- MOVIE Button
- Multi-Slc Center Btn
- Custom Button 5
- Fn Button
- Center Button
- Control Wheel/Left Button/Right Button/Down Button
- Custom Button 4
Why customize? While Sony engineers did their best to put the most crucial functions from the get-go, it’s never going to be exactly suited to your shooting style until you yourself get in there. If you have any issues, visit the Sony manual entry on on Custom Buttons here.
Here’s an example. Remember how we mentioned that the default ISO Custom Button 3 only works when in Flexible ISO or Log Shooting Off? If you shoot in Cine EI or Cine EI Quick, you’re much better off customizing this button to switch between your base ISO.
To customize, just enter MENU → Toolbox Icon (Setup) → Operation Customize → Video Camera Icon Custom Key/Dial Set.
Note: make sure you’re choosing the Video Camera Icon Custom Key/Dial Set. for video mode, not the Photo Camera Icon Custom Key/Dial Set. for photography mode. You can also select the Rectangular Play Button Icon Custom Key/Dial Set. if you’d like to customize how these buttons function while you’re in Playback mode.
From there, you move through the menu to find any setting you would like that button to control, and voila! So for example, if you’re looking to change the ISO Custom Button 3 as mentioned above, you’d navigate from Custom Key Dial Set menu to Top (where the button is located). Then select Button 3 and pick your new setting -- like Base ISO Switch!
Note: if you ever need to navigate backwards from any selection, just press the Menu button. It will take you backwards where you’ve come.

Using the Function (Fn) Button and Menu
While the Custom Buttons give you lots of options, they’re not limitless. For everything else, there’s Fn!
You get to the Function menu by pushing the Fn button or swiping up on the LCD screen.

The Function menu bar comes preprogrammed with twelve settings that you navigate using the Control Wheel. It will by default look like this, and you can click on theTrash Can Icon button to read an explanation of what each setting does.

These are all settings that are available in the Main Menu 1 and 2. However, the benefit of having them in the Fn menu is that you can swipe up or push Fn easier, and then view these settings while still monitoring the scene in front of the camera.
What if I can’t swipe up or touch control? You may have these settings off. Change them once to always have the ability to use the touch screen forever. Enter MENU → Toolbox Icon (Setup) → Touch Operation and make sure it’s set to ON with Swipe Up opening the Fn Menu.
Ready to customize the Function menu? It’s nearly the same process as customizing the buttons above, except you fork at the Fn Menu Settings.
Enter MENU → Toolbox Icon (Setup) → Operation Customize → Fn Menu Settings. You can customize 12 functions for Video mode.
Here’s an example. The sixth function on the top row comes default as PP (Picture Profiles). However, if you’re in Log Shooting Mode, you’ll never be able to use this option, and hence it’s greyed out. Instead, you could opt to instead set this to LUT. That way, you can quickly scroll through LUT options from the Fn menu while viewing how they look on your current image.
To do this, from MENU → Toolbox Icon (Setup) → Operation Customize → Fn Menu Settings, scroll over to PP using the Control Wheel, and instead choose Select LUT. That’s it!
Note: using the Fn button while inside the Menu does not call up the Function Menu but instead lets you scroll quickly from one menu page to the next.
Even though we’ve just gone through how to use Custom Buttons and the Fn menu, there are still a few more settings that you’ll need to access from the rest of the ‘deeper’ FX3 or FX30 Menu. The good news is that you can pin any of those important but harder-to-access settings into the easy-to-reach My Menu.
Here’s a quick look at each menu that we have access to from the MENU button:
- My Menu (Star Icon)
- This is where you can pin any of the deeper menu settings
- Main (House with Video Camera Icon)
- This is where Main1 and Main 2 house the most common settings you’ll ever need; see Part 1 for a primer on all things Main
- Shooting (Video Camera icon)
- Exposure/Color (+ and – Square Icon)
- Focus (AF/MF Icon)
- Playback (Rectangular Play Button Icon)
- Network (Globe Icon)
- Setup (Toolbox Icon)
The trick with My Menu is to decide which settings you’d like to be available. This may be something you realize with time and experience, and may fluctuate on different types of sets. Whenever you think of something you’d like to put here, press MENU → Star Icon (My Menu) → My Menu Setting → Add Item. From there, you will Add Item by navigating through the deeper Menu to pick the function you’d like to add. Unlike with the simpler Custom Buttons and Fn Menu, there’s almost no limit to the functions you can bring into My Menu.
A Cheat Sheet for a Few Popular Customizations
There are many unique settings that you may find yourself needing a lot on set. Here’s just a few of some of the most popular settings you can add in MENU → Star Icon (My Menu) → My Menu Setting → Add Item. Just find the item you’d like to add!
Note that you are not setting any of these functions, you are making the functions easily accessible in the My Menu so you can find and set them effortlessly on set!
- AutoFocus Touch Tracking versus Spot
Touch tracking can be a great way to utilize Sony’s incredible Autofocus. But what if you quickly want to switch between Spot AF and Tracking in moments where you might need the camera to follow a certain subject in the frame for you? After Add Item, access this via the Toolbox Icon (Setup)→ 5 Touch Operation → Touch Func. in Shooting. Adding this allows you to toggle between Touch Focus and Touch Tracking.
- Focus Breathing Compensation On/Off
Focus Breathing Compensation is a great new feature courtesy the latest firmware updates, but it does affect the angle of view. So if you’re not using it, it’s better to leave it off but have it accessible. From dd item, navigate to it in Video Camera Icon (Shooting)→ Image Quality/Rec → Lens Compensation → Breathing Comp. Note: you can also add this in the Fn menu!
- De-Squeeze View for Shooting in Anamorphic
If you’d like to effortlessly switch between shooting with standard and anamorphic lenses, add this setting after Add Item via the Toolbox Icon (Setup)→ 7 Display Option → De-Squeeze Display. From then on, this My Menu setting will let you toggle between Off, 1.3x, or 2.0x.
- HDMI Output Settings for Recording with an External Monitor
If you often use an external monitor to record, this is a great function. After Add Item, access this via Toolbox Icon (Setup)→ 11 External Output → HDMI Output Settings. This will let you toggle between the many external monitor output settings.
- Manage User LUTs for easy LUT upload/import
If you find yourself wanting to import new LUTs for different shoots, then make it easy to do so by including this up front. After Add Item, access this via the + and – Square Icon (Exposure/Color) → Color/Tone → Manage User LUTs. Import new LUTs from your media card. (For more on how to do this, see Part 1.)
- Generate or Sync Timecode
Whether syncing multiple cameras or just trying to make the editor’s life easier, adding the Timecode function to My Menu makes it a breeze to call up. After Add Item, access this via Video Camera Icon (Shooting)→ TC/UB. Then you can toggle between a Time Code Preset and Time Code Rec Run to Free Run.
That’s Part 2 of How to Unlock Your Camera’s Full Potential By Mastering the FX3/FX30 Menus. If you missed the basics in the Main Menu, don’t forget to visit Part 1.
If anything else comes up along the way, join the community discussion and get experts to weigh in at the Sony Cine Forums.