
08-04-2021 - Case Study, Gear, Technology
How I Filmed a Volcano – Shot on FX6 and FX3
By: Alister Chapman
Alister Chapman is a DP, editor, producer, educator, and is very well versed in technology and all things camera and video related.
To learn more about Alister Chapman, visit his website: xdcam-user.com.
Those who know me will know I like an adventure. For over 20 years I’ve chased violent thunderstorms, tornadoes and hurricanes. I’ve been up north of the Arctic Circle to film the northern lights more times than I can remember. One thing on my wish list of amazing footage was a volcano. But not just any volcano, a visually spectacular one. Many eruptions are just smoke and ash, I wanted bright, splashing lava fountains.
Back in January I was alerted to a swarm of many thousands of earthquakes in Iceland that hinted at something interesting happening. One small spot was shaking a quaking day and night. Then on the 19th of March, a 700 yard long fissure, or crack, opened in the ground on a mountain called Geldingadalir and lava started to stream out, coming from deep, deep down in the earth’s crust. Over the next few weeks new fissures opened and older ones closed until a small volcanic cone started to form in one spot.
While not exactly easy to get to, the volcano is in a location that any fit person could hike to, and it was visually spectacular. But at that time, I couldn’t travel to Iceland due to Covid restrictions, which was very frustrating. Finally, I got my Covid vaccinations and it became possible for me to travel to Iceland, so I booked the earliest possible flight.
Next I looked at how I would get to the volcano once in Iceland. The only access is on foot and it was going to be a pretty decent hike, especially carrying camera gear. The volcano itself is about 2.5 miles from the nearest road. There are trails up to it (or at least there were, one is now under 20ft of lava), each trail climbing a little under 1000ft, often over loose rocks and gravel. So I needed to put together a camera kit that would fit in a backpack but give me the lensing and image quality I wanted.
I decided to take both my FX6 and FX3 as each has slightly different capabilities. My plan being to start with the FX6 for the first hikes up to the volcano and then switch to the FX3 for later trips. For lenses I chose the Sony 200-600mm GM and what some may think is an odd choice – the Sony 24-240mm G lens. Neither of these lenses are particularly fast lenses, but in May in Iceland you have 24 hour daylight. I was also able to borrow an Atomos Ninja V+ and this would give me the ability to shoot 120fps 4K raw with the FX6. I also took a DJI Mavic Mini drone, and one final piece of kit that turned out to be a bit of a lifesaver was a Sony Xperia PRO mobile phone.

The weather in Iceland is always unpredictable, even in May. So, as well as good hiking boots, I had to pack for any and all kinds of weather and as it turns out, I got to experience just about every type of weather. I had lightweight clothes for the climb as I knew I would get hot, a warm jacket because the average temperature up on the mountain would at times only be a few degrees above freezing, and good, breathable waterproof gear as well.
Day one in Iceland I was up early – the sun streaming through the hotel room windows all night (top tip, if you visit Iceland in summer, take an eye mask). I drove up to the hastily prepared parking area at the start of the hiking trails and prepared my kit. It was a lovely sunny morning, if a touch on the cool side.
Over the top of the mountains I could see the huge plume of steam, smoke and gasses rising from the Volcano. I was excited and keen to get up there. The first part of the hike to the volcano was easy and I was soon nice and warm. After about a mile the first of the steep climbs came into sight. At this point the trail splits. Route “A” takes you up a long but gentle incline while route “B” crosses some very rocky ground before climbing very steeply up a rocky ravine.

The easier Route A, although looks can be deceptive, this is just one and the gentlest of several climbs to reach the top.
I decided to take the easier route A and headed on up. I soon started to wish I had spent a bit more time staying fit during lockdown! About ¾ of a mile later I reached the top of the first main climb and was soon rewarded with my first glimpse of the volcano far away across a huge lava field. I could clearly see giant fountains of lava erupting from the top of the volcano every 10 minutes or so.

Route B goes up the ravine.

I spent a short while looking at the edge of the lava field below me. You could feel the heat coming from it, the smell the sulphur, and I could hear all kinds of crackling, popping and hissing noises.
I decided I would shoot a few of the eruptions from here while I rested a little. The then weather turned. At first it was just a bit of rain, then the wind picked up, then came snow flurries and hail. The rain and hail caused great swirls of steam to rise from the lava fields, creating fog and mist that partially obscured the view of the Volcano.

After a while the mist cleared and I got the camera out and put it in its Camrade rain cover. The 200-600mm lens allowed me to get some pretty decent shots, but the heat haze above the lava field softened and distorted the image. So it was time to get closer, another couple of hills to climb to get to a much closer vantage point, but oh boy was it ever worth it.
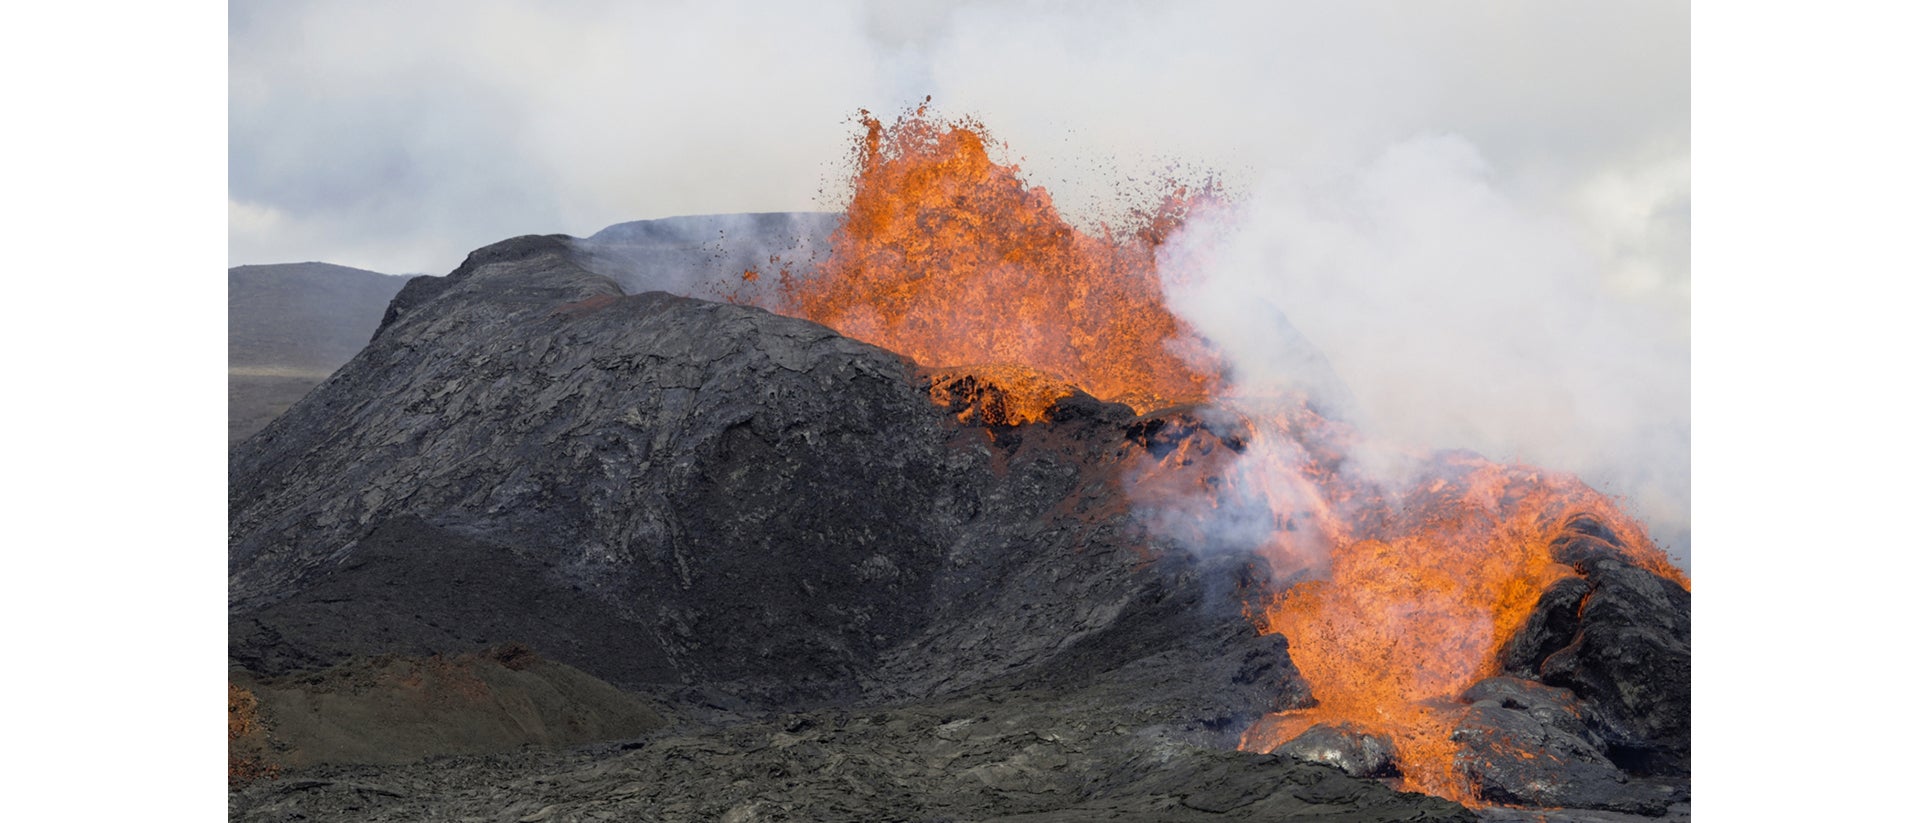
Eventually, I reached a spot directly overlooking the volcano only about 1/2 a mile from it. Every time it erupted, I could feel the heat on my face, hear the roar of the cascading rivers of lava as they gushed out of the volcano. In my videos of the volcano it’s difficult to judge the size of it. The smoothness of its sides makes it look quite small, but in reality it’s quite big. The torrents of lava you see in the my videos are 150ft or more across.

From here I filmed with the FX6 using the Sony 200-600mm and the 24-240 lenses. I shot using S-Log3 to give me the maximum possible latitude. Many of the shots were done at 120fps. I used the XAVC-I codec and v90 SD cards for up to 60fps and CFexpress Type A cards for the 120fps material. Still, the weather did its best to try to spoil things - it was very windy and there were frequent torrential downpours of both rain and hail. I only had a very lightweight tripod, normally for a lens like the 200-600 I would use a bigger tripod, but due to the long hike I decided to use a smaller and lighter one. Fortunately, the optical image stabilisation in both of these lenses is very good.

Once I had filmed several eruptions from this location, I decided to find another angle. So I packed everything back into my pack, got out my hiking poles and trekked back to the end of the main lava field. From there I went around the west side of the lava for about a mile and a half until I was at the place where hiking trail B came up to the volcano. By now the wind was really picking up but I was able to find a gully in the rocks and from there I could film the Volcano in relative shelter.

I decided to now get out the Atomos Ninja V+ to shoot ProRes Raw with the FX6. The Ninja V+ can record ProRes Raw at 4K at 120fps, so this would give me some very high quality, very gradable footage. To power everything I used a Mini Paglink battery with D-Tap outputs. When shooting with the Ninja V+ I tend to take advantage of its HDR monitoring capabilities to monitor using HDR10. HDR10 allows you to see just about the entire dynamic range of what you are shooting and I found this allows me to better judge how my sky and clouds looked against the dark black of the volcano and lava fields. I stayed at this location for around 4 hours getting a variety of different shots. At this point, I had been up on the mountain for around eight hours.

The weather was really starting to take its toll on me. I was starting to really feel the cold although my military surplus waterproofs had kept me dry. I’m a big fan of military surplus as it’s normally tough, built for abuse and very practical. The jackets often have huge pockets that are plenty big enough for large batteries, light meters and much of the paraphernalia that we camera people carry. And the best bit is you can pick up a set of decent breathable waterproofs for a fraction of the cost of a designer jacket. I was also getting hungry have long since eaten my sandwiches so I decided to head back to the car, this time using Route B.
This was a mistake!!
I set off across the top of the mountain plateaux to where Route B headed downhill. Walking across, I noticed the ground was covered in fresh volcanic rock. This rock called “tephra” is extremely light as it’s full of air pockets. It’s also extremely fragile, crumbling under foot. During an earlier phase of the eruption, molten lava had been flung so high in the air that the wind had carried it to where I was now standing, solidifying on the way and then falling as this lightweight rock.
When I got to the start of the descent down from the mountain, I discovered that the local rescue teams had installed a rope that disappeared down the ravine. The tephra and other loose and crumbling rocks on the ground meant that the route down was incredibly slippery, and it was also very steep. The rope was there to hang on to and help prevent a long 200ft slide or tumble all the way to the bottom. I was very glad for the rope. It took me almost an hour to descend down the ravine, one step at a time, each step like walking on ball bearings. By the time I got to the bottom I was truly exhausted but there was still another mile and a half to go across more loose rocks.
When I eventually reached the car I was truly done. Taking off the heavy backpack was such a relief, sitting down on the nice comfy car seat was bliss. But I had two more trips up to the Volcano planned.

DAY 2:
I was suffering from the amount of equipment I had taken up to the volcano on the first day so I decided to take less gear for the second trip. This time I would take the FX3. Again I used Route A to get to the top of the mountain. When I reach the first Lava field, I noticed it had changed a lot from the previous day. The face of the lava field was much taller, in places towering 20 ft or more in the air. At first glance it looks like solid black rock. But what it actually is, is a crust of hard rock over a molten lake of lava. Along the edges of the lava field you could look into the cracks and crevices and see glowing lava. And all of this is ever so slowly moving forwards. It makes all sorts of sounds, often a sound like smashing china. There are pops and bangs as pockets of gas escape, crackles, creaks and groans. In some places you could see the rocks moving quite quickly and every now and again there would be a mighty crash as a part of the red hot front wall would collapse, a reminder that this is actually a very dangerous place to be. I filmed this for a while before moving on to the vantage point directly in front of the volcano.
Once again, I found a spot directly overlooking the main volcano crater. The FX3 can also shoot in 4K at 120fps and once again I decided to shoot using S-Log3. By sticking to the lower of the FX3’s two base ISO’s (640 ISO) I knew I would retain the camera’s full dynamic range. To help assess the exposure I use the viewfinder Gamma Display Assist function as this allows you to view a nice, normal looking contrasty image on the LCD screen, very much like a Rec-709 LUT but only for the display screen. Do remember that if you use this function the zebras and histogram measure the recorded signal, so in this case the S-Log3, and you should adjust your zebras to suit S-Log3. For example, faces and skin tones will be around 51%.
In my pocket I had the Xperia Pro phone, so out it came and I plugged it into the FX3 via the built-in HDMI port to give myself a much larger monitor to work with. One of the great features of the phone is that you can pinch the touch screen to zoom into the image quickly and easily. The phone makes a great monitor without adding extra bulk to your camera kit.
For most of the shots I used the Sony 24-240mm zoom lens. I find this lens very useful. Optically it produces a really good image for this type of wide-range zoom. It’s compact, not too heavy, has good built-in image stabilization and for this kind of shoot, where weight and bulk really matters, having such a wide focal range in a single lens is really useful.
Once again the weather was typical of Iceland – changeable, and it changed almost every 30 minutes. Again I was rained on, hailed on, and the wind was still howling around the mountains. Some of this weather is generated by the volcano itself. The huge area of intense heat causes thermals and clouds continuously form over the volcano as a result. I find filming in bad weather very tiring. Constantly putting on and then taking off wet weather gear is wearing. The wind, rain and cold sap your energy, and if you don’t get up and move around regularly it’s very easy to get very cold. After about eight hours up on the volcano, I decided to start the almost three mile hike back down to the car. This time taking the more gentle route down.
 Day 3.
On the morning of the third day I had to take a COVID PCR test to be ready for my flight home. I was also completely exhausted. But the weather was also much better, a bit warmer and more importantly for me, the wind had dropped. So I decided I would only take my drone up and concentrate on getting some drone footage before returning to the hotel to pack everything in advance of my early morning flight home the next day.
As I reached the top of the first climb, I noticed many more people at the edge of the lava field than I had seen previously so I went to have a look. Once again everything had changed. Now there were rivers of brilliant orange molten lava flowing out along the very front edge of the lava field, but – I didn’t have a camera, darn. However, I did have the Xperia PRO and it does have three good cameras. By using the included Cinema Pro app you can shoot video with the same look as Sony’s s709 LUT. The footage from the Xperia Pro is actually quite good and I was able to get some good footage of the lava.

The biggest issue was the intense heat coming from the lava. The heat meant that you couldn’t get close without melting something. Imaging standing in front of a raging log fire, that’s the kind of heat you could feel on your face when standing 20ft from the lava. Once I’d captured the lava as best I could it was time to fly the drone. After 4 or 5 drone flights over the erupting volcano I was out of battery power, so it was time to head down for the last time.
This was actually the last day that anyone would be able to get very close to the volcano. With the lava fields constantly getting larger and deeper many of the routes up to the volcano were getting covered by lava. Over the next couple of days lava would flow over the very path I had taken to the my closest vantage points. 10 days later lava would flow over the upper part of “Route A” up to the volcano, cutting off access to large parts of it.
As I write this, I’m preparing for a second trip to Iceland and the volcano. A lot has changed since my first trip and I want to go and have another look. I know I won’t be able to get as close but it’s such an incredible sight that I want to document more of it. The lava fields continue to expand, there is a risk that it may soon cut off a major road. I’ll be taking almost exactly the same gear for this next trip. It works and it works well.


