
06-27-2023 - Gear
Mastering the FX3/FX30 Menus
By: Oakley Anderson-Moore
The FX3 and FX30 are incredibly powerful cameras that come with endless creative possibilities.
That also means each camera comes with a lot of menus. But we’ll let you in on a secret: over 80% of what you need is conveniently located in the cascading Main Menu or in easily accessible (and customizable) buttons. OK, it’s not really a secret – it’s how Sony engineers designed it so you would have everything you need in one place!
By spending a little time upfront to learn and customize your menus, you can make full use of all the features, and change them effortlessly between sets.
This is a two-part primer to help you do just that.
In Part 1, we’ll explain how to find everything in the Main Menu tabs, called Main 1 and Main 2. In Part 2, we’ll go over the equally important and easily customizable Function (Fn) menu, My Menu, and physical buttons on the body of the camera.
Here’s what we go over in Part 1:
- Getting started in MENU versus MODE
- Main Menu 1 and 2 Key
- Controlling Exposure from the Main Menu
- Electronic Aperture
- Shutter Speed
- Base ISO, Flexible ISO, Exposure Index
- Log Shooting Mode
- Selecting Frame Rates
- Rec Frame Rate (True 24.00P, 23.98, 29.97, 59.95, 119.88)
- S&Q Mode (Slow Motion, Timelapse)
- File Formats, Codecs, and Resolution
- How to Choose Between UHD, DCI Options
- Shooting Super35 Mode
- Formatting and Selecting Media
- Recording Proxies in-camera
- Color
- Importing and Using LUTs
- Using Picture Profiles with Log Shooting OFF
- White Balance
- Focus
- Auto or Manual
- Priority (Eye/Face and Human/Animal)
- Stabilization
- Sound
Let’s start with the basics!
Above your camera’s LCD screen are two prominent physical buttons: MODE and MENU. The MODE button on the camera allows you to set the camera for either Movie, S&Q or various Photography modes. For this primer, we’ll be concentrating on Movie mode. On to MENU!
When you push the MENU button, and you’ll see the second icon down and Main 1.

Above: Photo of Main 1 menu
Scroll down to a second menu that cascades from the first, and that’s Main2.

Above: Photo of Main 2 menu
What do these buttons get you? Here’s a breakdown. Let's start with Main 1.

Above: Graphic of Main 1 menu with numbered labels added for reference
Exposure
So much of the innate artistry of cinematography comes down to exposure, so controlling aspects like your aperture, shutter speed, and ISO are all conveniently located in Main1. Note that each exposure setting also has the option to toggle between Manual (which is represented with an M) or Auto (which is represented with an A) if you ever need to rely on automatic exposure settings.
Aperture
(Under Main 1, refer to labeled number 3)
All Sony and any supported and new lenses can control aperture electronically here.
Shutter Speed
(Under Main 1, refer to labeled number 2)
If you are looking to stick to the shutter rule of hand at 24FPS, with the newest firmware update, you can now set your Shutter Speed to exactly 1/48!
Base ISO in Cine EI mode
((Under Main 1, refer to labeled number 4)
If you’ve chosen Cine EI in Log Shooting mode located in Main 2 – arguably the most cinematic operation mode – then your ISO button offers two ISO options. On the FX3, you choose between two base ISO sensitivities of 800 or 12,800, and on the FX30, it’s between dual base ISO 800 or 2500.
Exposure Index (EI)
Inside Base ISO, you also have Exposure Index, which adjusts how your exposure behaves in relation to your highlights or your shadows. EI is the exposure index, so don’t attempt to use this setting to change the exposure! If you haven’t fully mastered EI, a safe bet is to leave it rated to the same value as the ISO until you know what you’re doing.
What if my ISO options don’t look like this?
Your ISO options will look entirely different depending on if you're in Log Shooting mode, and which Log Shooting mode setting you’ve selected. This is probably one of the most important choices you’ll need to before you shoot.

Above: Graphic of Main 2 menu with numbered labels added for reference
Log Shooting Mode
(Under Main 2, refer to labeled section 1)
Located in Main 2, Log Shooting can either be set to: Log OFF, Flexible ISO, Cine EI Quick, or Cine EI.
Why choose Log Shooting mode and Cine EI?
Log Shooting ensures maximum data and dynamic range for manipulating your image, and Cine EI gives you exposure that’s the closest to the camera’s internal sensitivities. Bottom line, it gives you the most data and least noise to ensure you can create the best image in post-production. We will dive into more about Log Shooting mode in the Color Science section below, and you can dive a little deeper into Sony’s Log Shooting and Cine EI breakdown here.
There are certainly good reasons to use the other ISO modes in Log Shooting, or to turn off Log Shooting altogether.
When using ISO in Cine EI Quick mode, the base ISO will be greyed out, and instead you will choose an EI setting, and the camera will automatically pick the base ISO that corresponds.
With ISO in Flexible ISO or Log OFF mode, the ISO will range from 160 to 409,600!
If you don’t want to use Log Shooting mode, we cover how to use Picture Profiles with Log Shooting mode at Log OFF in the Color Science section below.

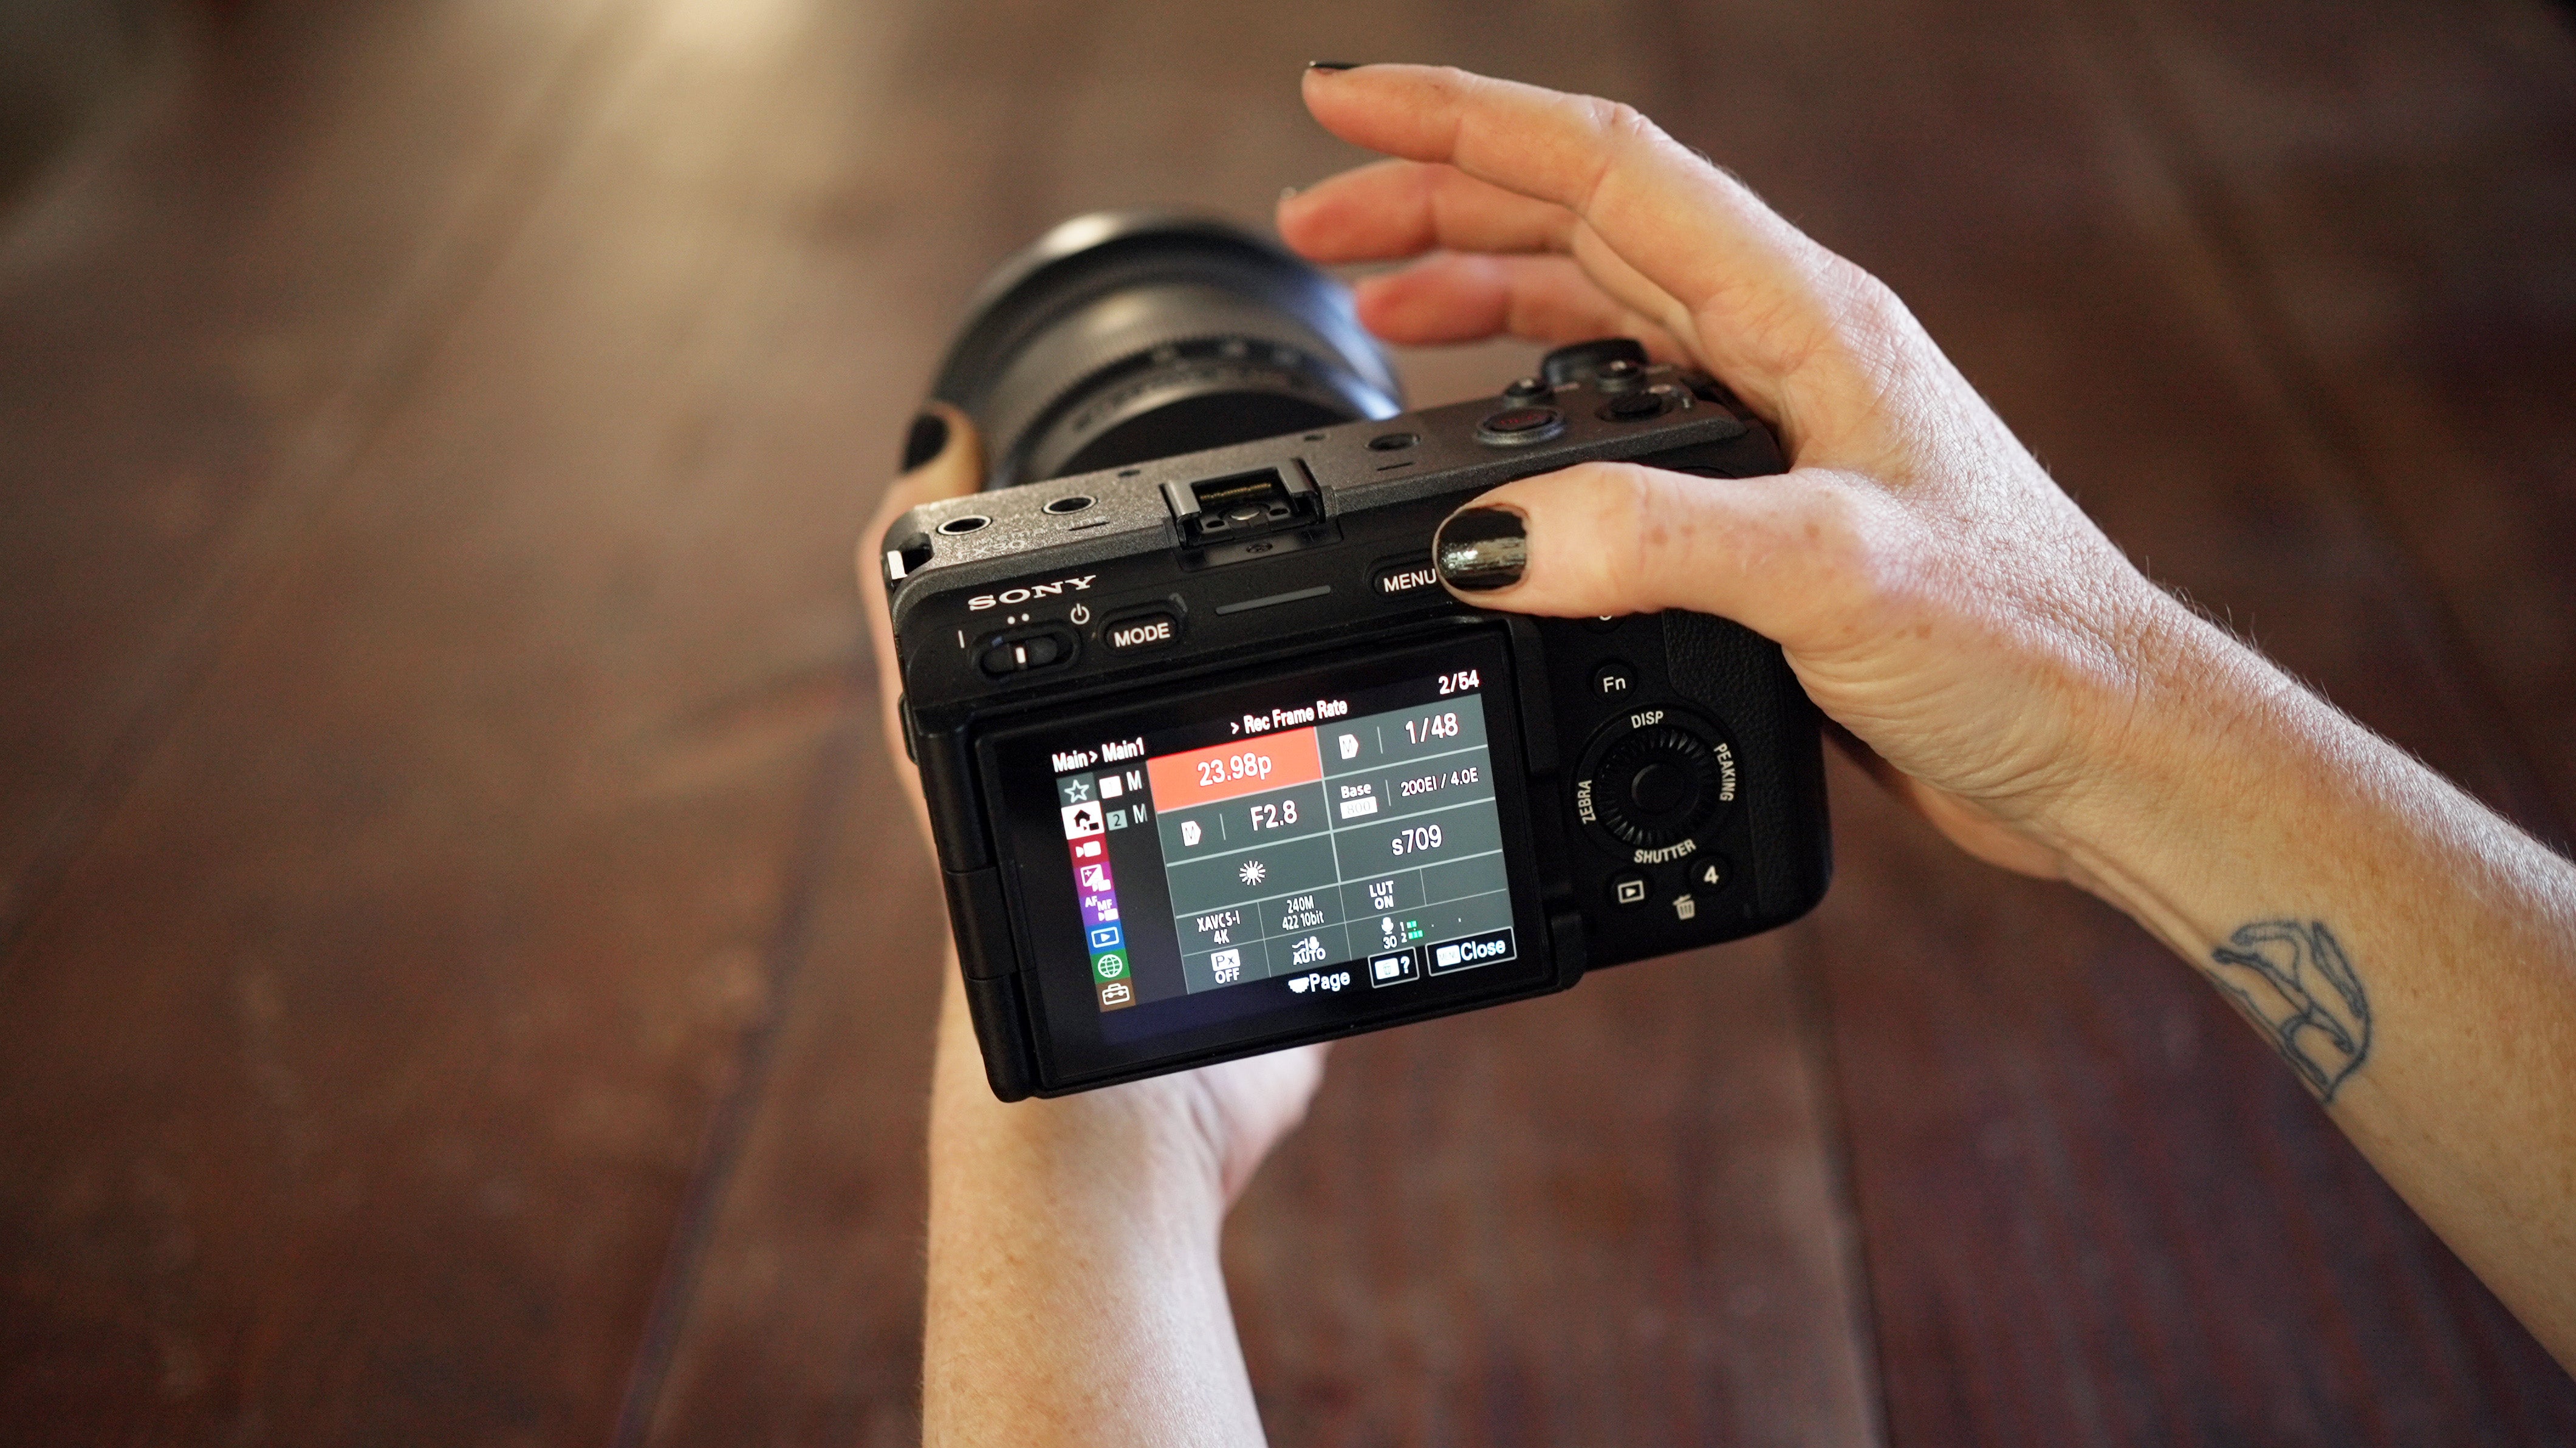
Above: Main 1 menu with frame rates highlighted
Frame Rates
It’s easy to toggle between frame rates, it’s literally the first button in Main 1. (see the section labeled 1)
All you have to realize is how different file formats will affect what frame rates you can choose from through the menu, and then choose it with the Rec Frame Rate button.
What frame rates can you use with which file formats?
XAVC HS: 23.98, 59.95, 119.88
XAVC S & XAVC S-I: 23.98, 29.97, 59.95, 119.88
XAVC S-I DCI: True 24.00P, 23.98, 29.97, 59.95
S&Q MODE
What about shooting at higher or lower frame rates, with the intention to create slow-motion or time lapse sequences? Enter S&Q mode.
S&Q stands for Slow and Quick, and you enter S&Q mode by leaving the MENU and hitting the MODE button. Here, instead of Movie Mode, you’ll select S&Q.
In the most recent firmware update, you can now customize this as a button so you don’t have to go into MODE anymore! (More on this in Part 2.)
Once you have S&Q mode selected, you’ll be able to go back to MENU and choose two types of frame rates in the Main 1: the frame rate to shoot at, and the frame rate to play back at. (Under Main 1, refer to labeled section 1)
This means that if you’re shooting 120FPS with the intention to use it in slow motion, you don’t need to modify, interpret, or adjust the speed in your editing software — the camera already does this for you.
The same happens on the other end of the frame rate spectrum for timelapses. If you select 15 frames per second to be played at 24 frames per second, S&Q will do that all for you in camera. Unless you need sound recording or the ability to playback at a different frame rate, this does the work of creating fast or slow motion sequences for you.

Caption: Above Main 1 menu with the shutter speed highlighted
File Format, Codecs, and Resolution
What type of material are you shooting, what are you editing on, and what do you need to deliver? To pick, use the File Format inside Main 1. (Under Main 1, refer to labeled section 7)
These are the formats you can choose between, with some useful specs to help you make your choice.
UHD File Formats
For shooting at 4K 3840 x 2160 in 16:9, these are the options. Note: each file format can also be selected for HD.
XAVC HS
- Uses H.265 compression, which is great for quality but may be harder for older computers to edit
XAVC S
- Uses H.264 compression
- Uses Long-GOP, which interpolates between frames to save on file size, but is slightly more taxing on your computer when it needs to process those frames
XAVC S-I
- Uses H.264 compression
- The “I” stands for all intra compression, which means the camera records every frame unlike Long-GOP
- Better image, but bigger file size too
- May be easier to edit because your computer doesn’t need to interpolate between frames like long-GOP
New DCI File Format
Thanks to the last update from Sony Engineers, the FX3/FX30 cameras can now record internally in DCI 4K at 4096 x 2160 at 17:9.
XAVC S-I DCI
- All Intra compression
- Compatible with DCI deliverables
There’s one more file format option we haven’t mentioned here, and that’s recording RAW using an external monitor. We’ll delve into that in Part two.
Bitrate
Right next to File Format, you can pick the bitrate you need. This only applies to XAVC S and XAVC HS file formats, as both XAVC S-I options will be locked in at the higest bitrates possible. (Under Main 1, refer to labeled section 8)
What about HD?
Yes, most people record in 4K by default. However, one good reason to shoot in HD is if you’d like to use Super35 lenses. You can change to APS-C S35 mode in Main 2 if you’re shooting in an HD File Format. (See Main 2, labeled section 2)
Media
Don’t forget a few other useful settings that pertain to your media.
Under Main 2, Labeled section 4 gives you the option to select which media slot to record to, and even the ability to record simultaneously to both cards for maximum backup!
Under 3 you can format either of your media cards, while under 5 you can change how your files are named (for example, to have all files start with FX3_ or ACam_).
Like to record proxies in-camera? Turn PX on under Main 1, labeled section 11.

Color
Over the years, Sony has perfected color science. Here’s how you use it! As we described under Exposure, to use LUTs, you first select Log Shooting mode in Main 2 (see labeled section 1)
Viewing LUTs (Look-Up-Tables)
Your first option is to use the s709 LUT which comes on the camera and is a great starting point for accurate color and contrast rendering with the traditional s-curve characteristics of film.
Choose to view with this or any other LUT via Main 1 under the labeled section 6.
How do I get more LUTs on my camera?
Check out the Sony LUT Library here for inspiration. Download the LUTs you want (as .cube files) and copy them to the LUT folder on your SD card, located inside the PRO folder, or this file structure: /Private/Sony/PRO/LUT.
Once your SD card is back in your camera, you’ll need to leave the Main 1 to import them. From the MENU, scroll out of Main 1 and down to the +/- icon (Exposure/Color) Menu → [Color/Tone] → [Manage User LUTs] → [Import/Edit]. After this, your LUTs will be accessible in Main 1. For more info on LUTs and some good options to download, check out the Sony manual here.
Log Shooting Mode versus Picture Profiles
The main reason to use Log Shooting mode is if you want the maximum information out of your image for perfecting in post. In Log Shooting Mode, you shoot in SLog3, and as we mentioned above, you choose between CINE EI or Flexible ISO.
Shooting in S-log3 CINE, you have maximum control during post production. It looks strange straight out of the box, but that’s the point! It’s using a logarithm to cram in all the information about highlights/shadows, color, contrast, saturation, and more into your image so you can pull it all up during the color grade.
Picture Profiles
On some projects, filmmakers don’t have the luxury to spend time color grading and correcting their shoot. Some filmmakers just plain don’t want to. Afterall, if you feel confident in your dynamic range and exposing properly, and you want the S-Cinetone look that already comes in Picture Profile 11, then go ahead and shoot in PP11!
To enable Picture Profiles, go back to Log Shooting mode via Main 2 labeled section 1 and set it to Log OFF. Then, instead of LUTs, you will be able to access Picture Profiles via Main 1 labeled section 6.
Note that once you disable Log Shooting and enable Picture Profiles, Main1 will now have two additional settings to turn on Gamma Display Assist and with what viewing mode you’d like it to display (Auto, S-Log3>709, HLG.)
White balance
You can pick your white balance based on Kelvin, setting presets (daylight, shade, tungsten) or manually with a white or gray card. See Main 1 label section 5.
Focus
The insane autofocus on the FX3 and FX30 lets you focus on eyes, track objects in the frame, and shift to manual focus without a glitch. Here are the three focus settings to work with in the Main Menu.
Go to Main 2 labeled section 8 lets you choose the type of focus (Manual or Continuous Auto) and from there Main 2 labeled section 9 is for selecting the Focus Area. Here you can choose between settings like Wide, where the autofocus capabilities will manage just fine, or Spot Focus if you need something tighter to dial in on.
There are two more Focus options here related to telling Autofocus what you’d like it to prioritize. In Main 2 labeled section 10 for Face/Eye Priority, you can ask autofocus to stay focused on the human eye and face in the frame. Did we say human? In Main2 labeled section 11 Face/Eye Subject you can select between human or animal to zero in on the eyes of anything from dog, whale, or grasshopper depending on what you getting close and personal with!
Stabilization
Anticipate some rugged handheld that needs to be smoothed out? Look for Steady Shot.
In Main2 labeled section 7 you choose between Active, which uses IBIS and Sony’s most advanced electronic stabilization software, Standard, which sticks to IBIS, and Off.
You can get amazingly smooth handheld footage without a gimbal using the Active setting. Active uses a slight crop to achieve this, so If you don’t anticipate that kind of movement, stick to Standard. Of course, if you’re planning to be locked off on sticks all day, then Off is all you need.
Sound
Don’t forget, sound is half the experience in filmmaking! There are two dedicated sound buttons in the Main Menu.
In Main 1, labeled section 12 is for Wind Noise Reduction if you’re in a super windy location where you might need the camera to process that wind out for you and Main 1 labeled section 13 is the Audio Rec Level where you can set your audio levels digitally if you don’t have an Audio Handle to do that directly.
Those are the basic building blocks that come preprogrammed in the Main Menu 1 and 2.
Where do I switch to tracking focus, find de-squeeze anamorphic, and record to an external monitor? And how can I change exposure settings while viewing the image?
Stay tuned for Part Two of this primer, where we dive into everything beyond these menus, including not just where to find them, but how to customize all your settings with the touch of a button!


