
11-17-2020 - Gear, Technology
The New Sony FX6 - The Definitive Review by Alister Chapman
By: Alister Chapman
Alister Chapman is a DP, editor, producer, educator, and is very well versed in technology and all things camera and video related.
To learn more about Alister Chapman, visit his website: xdcam-user.com
--
Great cameras come and go but once in a while a camera will come along that people will remember for a long time. Cameras like the original Sony EX1 or – dare I say it – the Canon 5D Mk2. Cameras that were turning points in the way we work and what we can do. I truly believe that the FX6 is going to be one of those cameras.
But why?

From the outside it looks little different to the Sony FS5. A little handheld camcorder that itself has become incredibly popular. The FS5’s light weight and highly compact form factor makes it great for handheld operation. Strip off the top handle and hand grip and it’s small enough for almost any gimbal and very popular as a drone camera. I got my own FS5 4 years ago and it’s been around the world with me many times. I’ve taken it to the Jungles of Southeast Asia and up into the Arctic. It’s an enjoyable camera to shoot with and it can deliver great images. But shooting with the FS5 has always, in my mind at least, been a bit of a compromise. The FS5’s codecs are not as strong as the codecs in it’s bigger brother the FS7. If you want to shoot using S-log2 or S-log3 it doesn’t have LUTs, plus there are some monitoring limitations if you are shooting in UHD. However, you do have to remember that the FS5 is a lower cost camera and despite some limitations it can produce great images.
So I was really keen to find out whether the FX6 would address any of these issues. The good news is that it does – and then some!
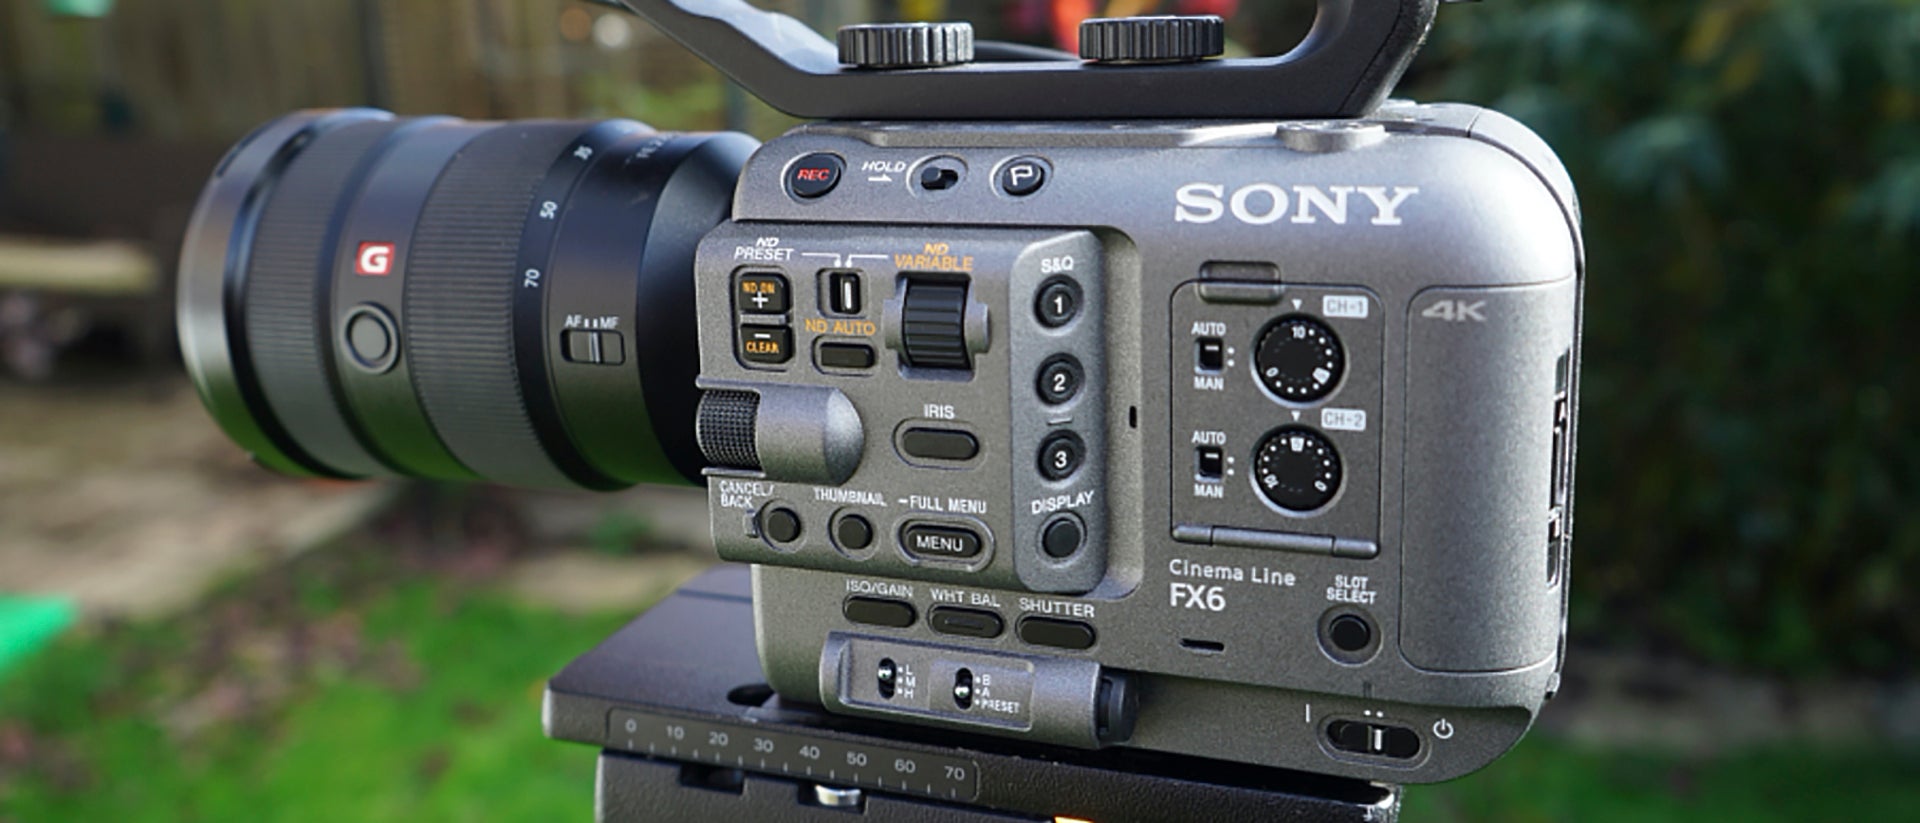
The FX6 is part of Sony’s “Cinema Line.” So instead of being boring but functional black it is the same metallic grey as the other two Cinema Line cameras the FX9 and VENICE. But it also shares a lot of its DNA with the recently launched A7S III mirrorless camera. This is no bad thing, the A7S III produces some stunning imagery thanks to its Exmor R back-illuminated, full-frame sensor paired with purposed designed BIONZ XR image processors that have up to 8x more processing power than previous generations. This helps it deliver those beautiful images using very little power.
One of the first things to catch my eye when I saw the FX6 was the huge but very stylish cooling vent that covers almost the entire right hand side of the camera. This to me was a clear sign that the FX6 was going to probably do a lot more than an FS5, more cooling allowing for more processing power. As you will see, I was not wrong.
On the left side the FX6 has a relatively uncluttered arrangement of buttons, switches and dials. At the front there is a slightly shrunk down version of the multifunction dial found on the FX9. Similar to the immensely useful the multifunction dial found on many broadcast and ENG cameras, this rotary knob can be used to scroll through the the FX6’s memory system and at the same time it’s possible to assign various camera control functions to it. It’s quick, easy to use and a huge upgrade over the fiddly little menu dial on the FS5.


The Menus and touch screen
The menus are accessed by a menu button just below the dial or a button on the handgrip. A short press of the button brings up a series of camera status pages that provide an overview of how the camera is set up. The camera’s LCD panel is a touch screen and the first six of these pages incorporate on-screen buttons so you can tap on the function or setting to change it. Most of the settings that you will commonly want to change such as record format, frame rate, etc., can be found on these pages and the touch screen makes it very fast to change these things. If you need to go to the camera’s main menu system you simply press the very same menu button for a bit longer. This then brings up the full menu system, which is very similar in design and layout to the FX9’s menus. Below the menu and back button, there are the now familiar buttons and switches for White Balance, Gain/ISO and Shutter. There is a further improvement here as to change a setting such as the shutter speed you have to press and hold the button. On previous cameras just bumping one of these buttons could result in an accidental change to your settings.

As well as the buttons on the side of the camera and the handgrip, extra assignable buttons and controls have been added to the camera’s top handle. There is the usual record button and a zoom rocker, but as well as these, there is an assignable rotary wheel that can be used to control, for example - the aperture or ND filter and a thumb stick that can be used to scroll through the menus or access many of the camera’s other functions directly via thes “direct menu” function that allows you to change most of items displayed on the LCD screen without going into the menus. In addition, you will find two additional assignable buttons. The net result is that it is possible to hold the top handle and control the camera with one hand. This is great for low-angle handheld shots.


Like the FS5 the FX6 has a variable ND filter. The controls for this are just above the multifunction dial and includes a rotary control as well as switches to go between manual and automatic control. Once you’ve used one of Sony’s cameras with a built-in variable ND filter, not having one seems clunky and old fashioned. Having a variable ND filter that smoothly goes from ¼ ND (2 stops) to 1/128th ND (7 stops) changes the way you shoot. With most normal cameras your primary way to finely control the exposure is via the lenses aperture. But when you have fine and precise exposure control via the ND filter you can use aperture purely as a depth of field control and then get perfect exposure using the variable ND. This has many benefits, in particular the way the depth of field won’t change if you need to adjust your exposure mid shot, especially handy if using auto exposure (via auto ND). You can manually control the ND filter with the rotary dial. The camera starts in “clear” mode where the ND filter is removed from the optical path, turn the dial and the ND filter is engaged and brought into the optical path starting at ¼ ND. Keep turning the wheel to add more ND or turn the wheel in the opposite direction to reduce the amount of ND or remove the ND from the optical path.
The E-mount Lens Mount
The FX6 does not have the heavy-duty locking E-mount that’s used on the FX9 and also found on the Sony VENICE digital cinema camera under the removeable PL mount. Instead it has a conventional bayonet E-mount as you would find on any of the Alpha cameras or the FS5. I really think this makes sense on this camera. A lot of the time the FX6 will be used handheld. If you have one hand holding the camera it’s much easier to swap a lens on the conventional mount that the locking one and the FX6 camera is designed for handheld shooting. The hand grip on the FX6 appears to be the same rotating handgrip as on the FS5. It’s comfortable in the hand and the record button falls right where it should.
Full Frame Sensor
The FX6 has a Full Frame 4.2K sensor. It is not a 6k sensor as in the FX9 or VENICE. There are pros and cons to this. Being “only” 4.2K the pixels are huge (around 8.36 µm) so the low light performance is impressive to say the least (more on that later). Fewer pixels also means a faster readout speed and the FX6 really is no slouch. Rolling shutter is very, very minimal thanks to a readout speed of around 9mS. This is just what you want in a handheld camera or one that might end up on a gimbal or drone.
But a 4.2K Full Frame sensor can’t also offer a 4K super 35 mode or a 2K super 16mm mode. For those you’ll want the FX9 and its 6K sensor. So perhaps a small compromise of the FX6 is that it really is designed for Full Frame only. You won’t be able to use a lot of traditional PL mount cine lenses or lenses designed for APS-C with the FX6 unless you are happy to shoot using its HD-only super 35mm mode. But if you are an HD shooter, then super 35mm is still an option.
Autofocus
The FX6, like its bigger brother, the FX9, has the most amazing autofocus system. It’s a hybrid system that uses a combination of phase detection and contrast for speed and accuracy. It features face and eye detection and is highly adjustable. I used to be an autofocus sceptic having had many frustrating and disappointing autofocus experiences with video cameras. This changed when Sony launched the FX9. The accuracy and reliability of the AF in both the FX6 and FX9 is amazing. The FX6 in most cases can focus better than I can. It almost never hunts for focus, instead just going directly into focus. It’s particularly effective when trying to follow moving objects, especially people, where the ability to select an individual face allows you to follow one person in a crowd or group. Frankly the camera can focus better than I can in most cases.
Using the touch screen you can easily move the focus point from one part of the frame to another by using the camera’s “flexible spot” focus zone. Simply touch the screen where you want the camera to focus. You can tailor the focus speed to suit your needs from fast to slow. I personally prefer my autofocus set slightly on the slow side as this makes it look more natural than a very fast, snappy AF. You can also adjust how responsive the AF is. When set to “responsive” the camera will quickly react to new objects or people entering the shot and re-focus. When set to “locked-on” it will hold onto the same object/subject even if other things enter the frame. A great example of this would be shooting something on the other side of a street and the AF not being disturbed by cars passing between you and your subject.
Of course, for the AF to work you need a lens with autofocus. The Face/Eye AF makes filming people incredibly easy. When the camera is set to Face/Eye priority it will prioritize faces over other objects in your shots. You can then tell the camera which face out of a group to prioritize using a movable cursor. Once the camera has identified a face it will focus on the eyes of the person, this is indicated in the viewfinder by a small box drawn over one of the person’s eyes. You can be sure that when shooting people it’s their eyes that are sharp, not a nose or ears. Set the camera to Face/Eye Only and it will ignore anything that isn’t a face. Register a face and it will then only focus on that face, no matter what else might enter the shot. If the camera momentarily loses the registered face the AF won’t hunt or adjust until the registered face is once more recognised. This mode is brilliant for interviews. Because Sony included video capabilities in their E-mount stills cameras from the very beginning, most Sony E-mount lenses have been designed with video in mind and include features such as greatly minimized focus breathing and low noise or silent AF motors that are really important if you wish to shoot video and use AF. For the very best AF experience the FX6 and a Sony lens are the way to go. I use the AF on my FX9 far more often than not and it rarely gets it wrong. The FX6 is just as good and I expect I will use AF more often than not once I get my own FX6.

Dual Card Slots
To store your recordings you are provided with two dual-mode card slots than can accept either SD cards or CFExpress Type A cards. You can record most of the available codecs and frame rates onto SD cards if you use the latest high speed UHS-II V90 SD cards. However, if you do want to take advantage of the camera’s amazing 4K 120fps S&Q mode then you will need to use CFExpress Type A cards. The transfer speeds possible with CFExpress cards are impressive, peaking at around 800MB/s. In practice, with the right card reader, this means offloading files from a CFExpress card will be around 3 times faster than from the fastest SD cards. I was able to offload 64GB of footage from a CFExpress card to an SSD in around 5 minutes.
UHD, DCI and Frame Rates
The FX6 can record not only 16:9 3840 x 2160 UHD but also 17:9 4096 x 2160 DCI 4K. Perhaps a bigger surprise was finding that as well as 23.98fps it can also shoot at 24fps. I can see now how the FX6 really deserves to be part of the Sony Cinema Line. The FX6 has the same codecs as its bigger brother the FX9 including 10 bit 4:2:2 XAVC-I class 300. So no matter whether you are shooting HD, UHD or 4K DCI your recordings can be 10 bit 4:2:2. XAVC-I Class 300 was first introduced with the PMW-F55 Cinealta digital cinema camera around 7 years ago. It is a great codec that is supported in all of the major edit and grading applications and pretty much universally accepted by broadcasters. It offers a great balance of image quality and file size. If you shoot S-log3 using XAVC-I it normally grades very well. As it’s an I frame-only codec it’s easy to work with in post-production and requires less processing power that the XAVC-L codec that the FS5 is restricted to. But if you are short of card space you do also have the option to select XAVC-L.

What do the pictures look like?
So, you’ve recorded some footage, how does it look? Frankly – really good.
The FX6 has two base operating modes. In its default setup it has the same S-Cinetone gamma curve and color matrix as the FX9. S-Cinetone borrows heavily from what was learned during the development of the color science used in the Sony VENICE digital cinema camera. S-Cinetone is designed to produce a pleasing, contemporary film style look, tailored for video productions where there won’t be time for grading or extensive post production. It features a curved toe (shadow) response and a smooth shoulder that blends seamlessly into a deep highlight roll off that retains textures all the way to the clip point. The toe and shoulder curves mean that you can fine tune the contrast in your footage through your exposure. Expose a little brighter and the overall impression is of a less contrasty and more video like image. Expose a touch darker and the footage takes on a more contrasty filmic look. Personally, I like to expose S-Cinetone so that skin tones are between 55 and 60% and t
If you wish to use a different gamma curve to S-Cinetone then you can change this in the camera’s paint settings where there are several preset scene files to choose from, each giving slightly different looks. These scene files can be adjusted and different combinations of gamma and colour matrix can be chosen to suit your needs. If you want to shoot log or raw there is a dedicated Cine EI mode.
Exposure Aids
To help with exposure you will find that the FX6 has the usual zebras. Zebra one is designed for skin tones and has a window over which they will appear, the default being 70% brightness with a +/- 5% window. So, zebras start to appear at 65% and are gone by 75%. On the FX6 I set my zebras to 60% as this works well with S-Cinetone skintones. 60% zebras can also be useful assessing the exposure of a white card or white piece of paper when shooting using S-Log3 in the camera’s dedicated log mode called CineEI. Zebra 2 is designed to show when you are approaching clipping. Zebra 2 by default is set to 100%. It doesn’t have a window over it like zebra 1, instead Zebra 2 comes on and stays on whenever the signal is higher than the set level.
As well as Zebras the FX6 also has a signal monitor function that can show either a waveform, vectorscope or histogram. The waveform display has a very neat trick which is to add a yellow line across the histogram that matches your zebra level settings. This is very useful when you want to measure a specific exposure level such as when using a white or grey card to check your exposure. I wish more cameras had this, it makes the waveform much more useful.

Cine EI mode
One thing the FS5 does not have is a dedicated log shooting mode. The FX6 has a mode specifically for shooting using S-log3 or RAW called “Cine EI”. EI is short for “Exposure Index”. In this mode the camera’s settings are optimized for the capture of the greatest possible dynamic range and maximum post-production flexibility. In Cine EI the camera records at either of its two base ISO settings of either 800 ISO or 12,800 ISO. When testing the camera with a Xyla dynamic range test chart I was able to count 15 one-stop steps at both ISOs. At 800 ISO the noise levels are very low and when shooting with the camera at 800 ISO I was really pleased with the S-Log3 images. They are highly gradable and look very nice. Raise the base ISO to 12,800 and the noise does increase a little bit and as a result the useable dynamic range is a touch lower. But it isn’t a big difference, especially considering the 4 stop (16 times) difference between the low and high base ISOs. Shooting at 12,800 ISO produces some very nice, highly gradable images. My preference would be to use 800 ISO wherever possible. You have less noise so can push the image further in post, but for night shoots, having 12,800 ISO as your starting point and only giving up the tiniest bit of dynamic range is quite an eye opener.
The Cine EI mode makes shooting S-Log3 easy. It allows you to add a LUT (Look Up Table) to the viewfinder or SDI and HDMI outputs to simulate how your footage may look after it has been graded. The default LUT is the same s709 LUT as used by the Sony VENICE digital cinema camera. In addition to the built-in LUTs you can also load your own 3D Cube LUTs into the camera. One slight quirk that I did discover was that when loading a user LUT into the camera, once the LUT has been placed in the correct folder on your SD or CFExpress card, you can only load the LUT when the card is placed in slot 2, it won’t load from slot 1.

Once you have chosen the LUT you wish to use it can be applied to either the viewfinder or to the SDI/HDMI outputs or to both. I did not find any restrictions as to when I could apply a LUT. They even work when shooting using S&Q at 120fps. If you use the touch screen menus then you can simply tap on the LUT On/Off buttons for the SDI/HDMI out and the Viewfinder to quickly toggle the LUT on and off. The LUT functions are very easy to use and very flexible. If you are using the waveform display to assist with setting your exposure, if the SDI/HDMI LUT is off then it measures the S-log3, if a LUT is on then it measures the LUT level. To avoid confusion what the waveform is measuring is indicated immediately above it.

Once you have enabled a LUT the Cine EI function allows you to add an exposure offset to the LUT. This offset only changes the brightness of the LUT and has no direct effect on the recording levels. If the camera is set to 800 base ISO and the Exposure Index is set to 800 EI then there is no offset so expose the LUT correctly and the S-Log3 recordings will be exposed at their normal levels (the normal exposure levels for S-Log3 are Middle Grey 41%, White Reference Card at 61%). If you change the Exposure Index to 400 EI then the LUT will become one stop darker. If monitoring via the LUT then you will be inclined to open up the aperture or reduce the variable ND filter by one stop so that the viewfinder image looks correct again. This will then result in the S-Log3 recordings becoming 1 stop brighter. This can be beneficial if you want an image with less noise, brighter recordings tend to be less noisy. But because you are raising the mid point of your exposure you will reduce the highlight range by one stop though at the same time you will be gaining one stop in the shadows. A one stop offset like this may prove useful when shooting at 12,800 base ISO where the camera is a little more noisy. If you were to set the EI to 6400 EI and expose via the LUT, your one-stop brighter recordings will help eliminate the noise difference seen between 800 ISO and 12,800 ISO.
Having a fully functional Exposure Index system with versatile and comprehensive LUT options in such a compact camcorder is brilliant. It makes getting your exposure right so easy, especially when shooting quickly or for all those applications where you can’t use a light meter or grey card. Of course, you can still use a light meter if you wish and I can confirm that the FX6’s ISO ratings perfectly match my light meter.

Image above – frame grab from UHD 120fps (shot in Cine EI with S-Log3/SGamut3.cine and graded in post production)
UHD 120fps
The FX6 can shoot UHD at 120fps and the image quality is excellent. To shoot UHD 120fps you will need to use CFExpress cards; SD cards are not fast enough. Also, when shooting UHD 120fps the sensor is cropped very slightly so the camera can use a 4K native scan instead of the 4.2K scan used when shooting at up to 60fps. This 1.1x crop is barely noticeable and a very small price to pay for top quality 120fps UHD. It’s very easy to get carried away and start shooting everything that moves at 120fps when it looks this good. There are no nasty image artefacts, the dynamic range is not reduced, and the UHD 120fps files look amazing. You can even use the full Cine EI mode to shoot Slog3 at 120fps with a LUT in the viewfinder or on the HDMI or SDI output. I predict a deluge of slow motion videos from new FX6 owners.
The LCD Screen
But what about the viewfinder? It’s all very well having great LUTs etc, but if the viewfinder isn’t up to scratch these can be difficult to use. Well the good news is that the viewfinder, or should I call it “LCD screen,” is really rather good. It appears to use the same panel as its bigger brother the FX9 and it’s clearly higher resolution than the FS5’s LCD screen. The FX6 comes with a clip on sunshade for the LCD screen that folds closed to protect the screen from damage when you’re not using the camera. It then unfolds to create an effective sunshade when you are shooting. But being just a sunshade there could be some situations in very strong sunlight where it may be difficult to see the LCD screen. As an option it is possible to use the viewfinder loupe from the FX9 with the FX6. I believe the FX9 loupe can be purchased as a spare part from most Sony dealers. As the LCD is a touch screen and the touch screen functions are very handy the folding sunshade is a good compromise as it doesn’t restrict the use of the touch screen and does keep all but direct light from the screen.

On the left side of the LCD panel there are buttons for Peaking and Zebras as well as an additional assignable button that by default actives the excellent focus magnification function. The LCD screen can be attached to the camera in many different locations to suit your shooting style. If using a gimbal the viewfinder cable is long enough and flexible enough to mount the LCD somewhere on the gimbal rather than the camera itself.


Inputs and Outputs
The FX6 is a very well connected camcorder. You have all the usual connectors expected for a professional camcorder. On the back of the camera you will find a full size HDMI socket and a 12G SDI output that also doubles up as the camera’s RAW output. I wasn’t able to test the RAW output as at the time I had the camera a suitable recorder wasn’t available. The 12G SDI allows you to have a 4K, UHD or HD output from 24fps to 60fps – and remember you can add LUTs to this. The HDMI output will also output from 24fps to 60fps from HD to 4K. But it gets better, as you can use both at the same time, at the same resolution or you can set the HDMI to output HD while the SDI outputs UHD. With the FS5 there was an odd limitation that meant you would lose the viewfinder display when outputting UHD via the SDI or HDMI while recording internally. The good news is the FX6 does not have this limitation so you can monitor with the LCD and output via HDMI and SDI at the same time.
It’s got timecode too!
One thing that really took me by surprise was to find that the FX6 has a connector for timecode that can be switched between TC in or TC out. At this stage I am beginning to wonder if there is anything the FX6 doesn’t have? Just below the timecode connector there is a multifunction port that is very similar to a micro USB port. You can use this to attach a remote control device that uses this type of connector (the FX9 hand grip uses this connector).

4 Audio Channels
In addition to the microphone built into the camera’s top handle there is a pair of XLR audio connectors on the removable handgrip as well as an MI-Shoe. The FX6 is able to take advantage of both top handle mic and the XLRs or the XLRs and the MI-Shoe at the same time. As it can record four channels of audio it’s not limited to two channels as the FS5 is. There are two control dials on the side of the camera body for channels 1 and 2 and then channels 3 and 4 are adjusted in the menus. The MI-Shoe can be used with Sony UWP-D radio mic receiver or you can add another pair of XLR inputs via an adapter such as the XLR-K3M. One consideration is that if you do remove the top handle, say to use the camera on a gimbal, you do loose the mic that’s incorporated into the handle as well as the XLR inputs and MI-Shoe input.


Power and Batteries
The FX6 takes the same BP-U type batteries as the FS5, FS7, FX9 and many other Sony handheld camcorders. These are pretty common now and readily available. The FX6 needs more power than the FS5, bit quite a bit less than the FX9. The smallest battery, a BP-U35 will run the camera for about 90 minutes. For external power there is a 19.5v power socket that uses the same connector as found on many laptop computers. 19.5v is a strange voltage, most cameras run off a 12 to 14v power supply. A power supply is provided with the camera and I suppose one saving grace is that as this is the same as a laptop power supply replacements or spares are easy to obtain and cheap.
OK, so if the FX6 is really so good why would anyone chose to buy its bigger brother the FX9? To be honest for many people the FX6 really is probably all they will ever need. But it is very small and it is really full frame only. The FX9’s 6K full-frame sensor does give it much more flexibility when it comes to scan modes including 4K super35 and the soon to come 2K super16 center-scan mode. The FX9 also has a whole host of networking functions and live streaming capabilities that will appeal to broadcasters doing live news. The FX9’s locking E-mount is stronger and more stable making it better for use with heavier lenses such as PL mount lenses and its increased real-estate provides more room for all the accessories that are often used during digital cinematography. So, there’s definitely still very much a place for the FX9. Both cameras complement each other and because the images from both are so well matched whether shooting S-Cinetone or S-log3 mixing and matching is easy. S-Log3 footage from the FX6 also cuts very well with footage from VENICE, so it wouldn’t surprise me to see the FX6 used to get into very tight spaces or as a crash cam on big budget productions.

Frame Grab from the FX6
There is a lot to like about the FX6. It’s small, compact and lightweight, yet it packs one hell of a punch. And this is why I think this will be one of those cameras remembered for a long time. It isn’t radical, it doesn’t do any one thing that no other camera can do. But it packs an incredibly complete set of features and functions into an amazingly compact body. As users of the FX9 will tell you, Sony’s new colour science and S-Cinetone makes it easy to shoot beautiful images straight from the camera. The FX6 will be great for those that don’t want to spend hours in a grading suite. But if you do want to shoot with log or raw you have a fully featured CineEI mode with LUTs available on every output and in the viewfinder in all modes.
The sensor produces beautiful images with great color and a huge dynamic range. Noise levels are remarkably low even at 12,800 ISO so those who shoot in low light will find it an excellent performer. I’m really looking forward to seeing what the RAW output can deliver, but you can already get amazing-looking images from it just as it is. There are many small cameras that perform well on the market right now. But the FX6’s feature set including the variable ND filter, CineEI mode with LUTs, four channels of audio, S-Cinetone, 4K 120fps, outstanding autofocus, diminutive size and ease of use will make this camera extremely attractive to a wide range of users. I’m really looking forward to getting one to take to Norway to shoot the Northern Lights once travel restrictions ease.


