08-20-2019 - Gear, Technology
Working with Venice Material in DaVinci Resolve
By: Alister Chapman
In this article I’m going to look at some of the do’s and don’ts of working with material shot on a Sony Venice camera. I’m not going to go in to details on how to edit or how to grade, but look at some of the different workflow options available to you and point out a few things that you need to know. In particular, if you are not interested in the color managed workflows, do please take a look at the section on “Changing the raw decode” for some information on selecting the right decoding options for Sony RAW and X-OCN material.
DaVinci Resolve is an incredibly powerful editing and grading tool. It is probably the most widely used color grading application in existence today, thanks in no small part to the fact that there is a free version that has almost all of the features of the paid version.
Getting footage into Resolve is very easy. You can either use the Media room (Resolve calls each page or section a “room”) to navigate to your content or you can drag and drop the content from the systems browser or finder directly into Resolve. For content on AXS and SxS cards you can simply drag and drop the entire main folder into Resolve and all of the clips on the card will become available in the Media room and Edit rooms.
Within Resolve there are different ways of managing the color science used for editing and grading. By default Resolve uses a conventional YRGB workflow that most people will already be familiar with. In this workflow X-OCN content will appear in your project converted to S-Log3 by default and will behave in a very similar manner to any XAVC or ProRes S-log3 content. You can grade this material manually or if you prefer, add a LUT to convert it to your desired output standard.
In addition Resolve offers the ability to work using a couple of different color managed workflows. There is DaVinci’s own “DaVinci YRGB Color Managed” workflow as well as the Academy of Motion Pictures “ACES” workflow. The different workflows are selected in the Project Settings “Color Management” page.
A Color Managed workflow differs from a conventional workflow in that the grading application takes care of any color space conversions internally. There is no need to use LUTs for example to convert from S-Log3 to Rec-709. This brings many potential benefits, especially if you are producing content that will be output in differing or multiple standards. Perhaps you are producing an HDR program but will also need to produce an SDR version.
My preferred color managed workflow is ACES. I find that ACES appears to handle multiple output options very well and as a result it is my “go-to” workflow for HDR productions where I will also need an SDR version. Within Resolve there are 2 versions of ACES, ACEScc and ACEScct. Both add a film style highlight roll off to the output that gives a very pleasing rendition of highlights and the brighter parts of a scene. ACEScct adds a toe that helps prevent blacks from getting crushed too easily and I believe most people will find they are able to more easily achieve a good looking final image with ACEScct. However if you wish to use ACES there is no hard and fast rule as to which to use and you should try both ACEScc and ACEScct and compare how the deep shadow areas of the image behave and choose the one you prefer.
With a color managed workflow you need to tell your grading software what you shot with and how you want it to be output. Once you have selected a color managed workflow in the Color Management page of the project settings you will also need to set the correct input and output options.
With the “DaVinci YRGB Color Managed” workflow, as well as the input and output options, you also need to define the color space that you wish to use for the project’s timeline.
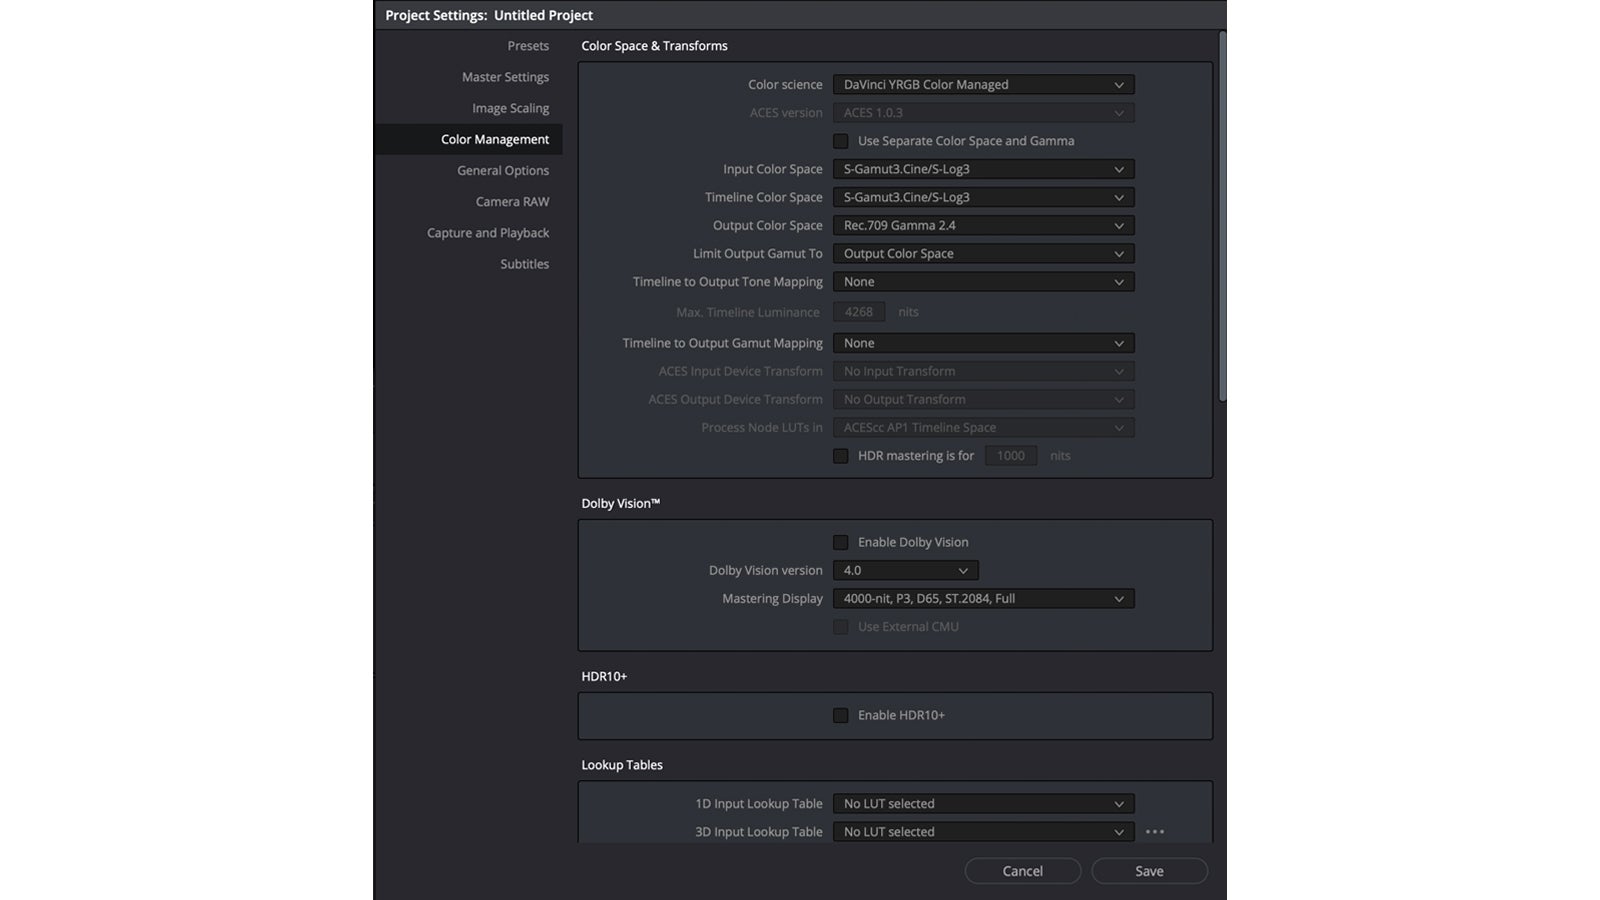
For a Venice Project using DaVinci YRGB Color Managed you would normally select S-Log3/S-Gamut3.cine (The Gamut setting should match the Gamut selected in the camera) for the input color space. The output color space should be set to match your desired output color space – for example Rec.709 Gamma 2.4 for an SDR production or perhaps Rec.2100 ST2084 for an HDR10 production. For the timeline settings there are many options depending on how you wish to work. But generally, you will want to select a large Gamut/Gamma for the timeline so that you don’t limit the range that you work in. My suggestion is to use S-Log3/SGamut3.cine.
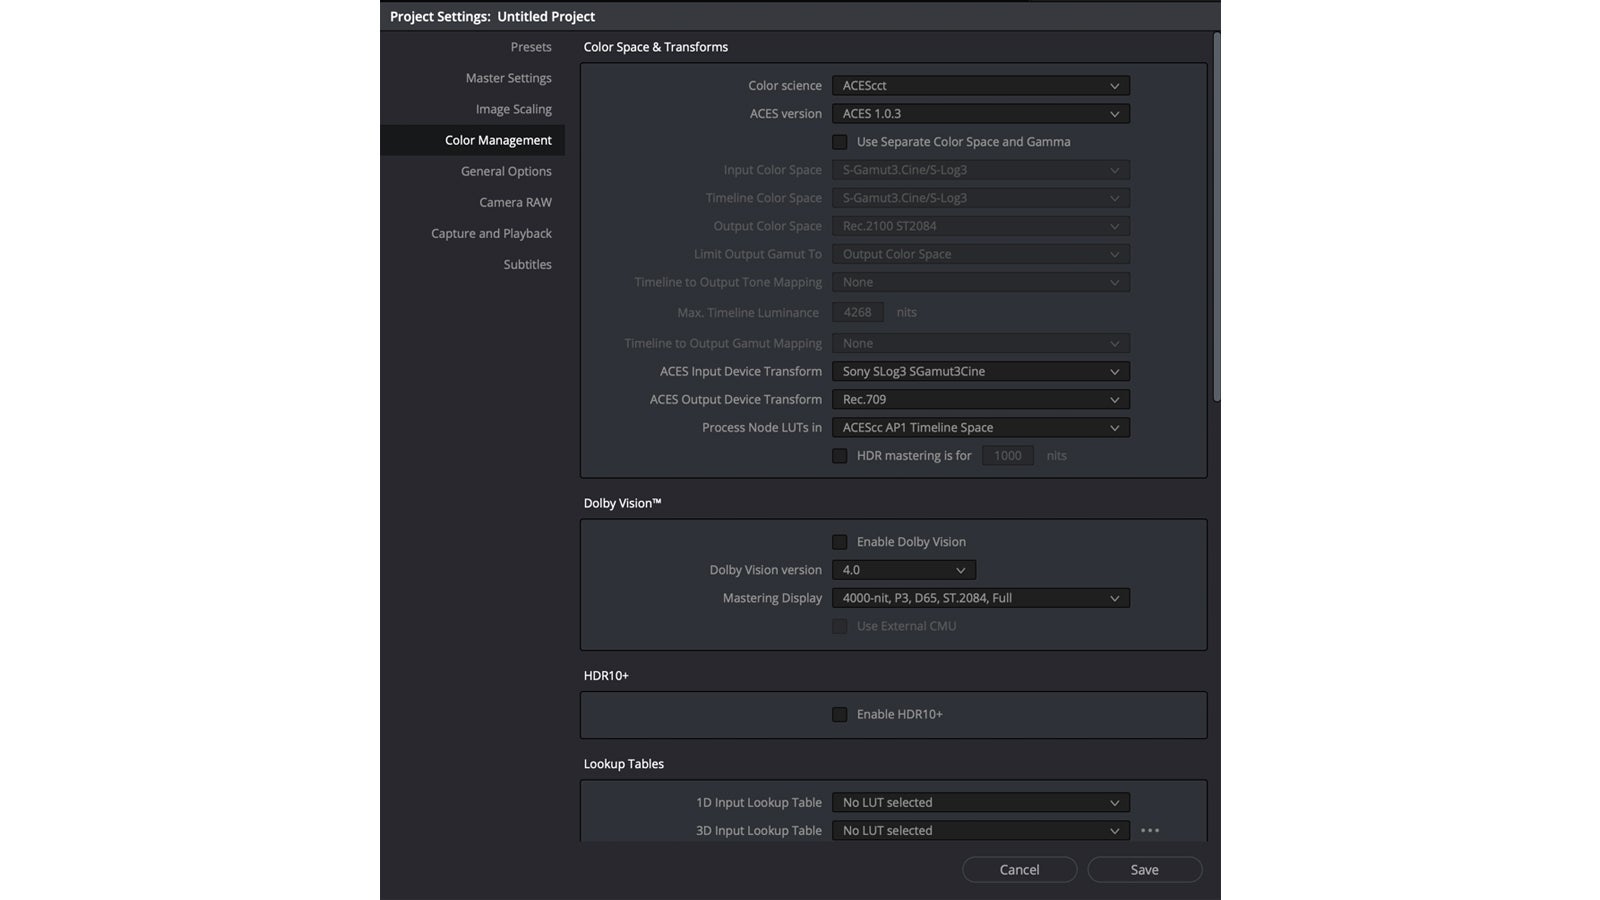
For a Venice Project using DaVinci ACEScc or ACEScct for SxS content you will want to set the input transform to “Sony S-Log3 SGamut3cine” (to match the gamut selected on the camera) and then for an SDR output you would select “Rec.709” or for an HDR10 output select “Rec2020 ST2084”.
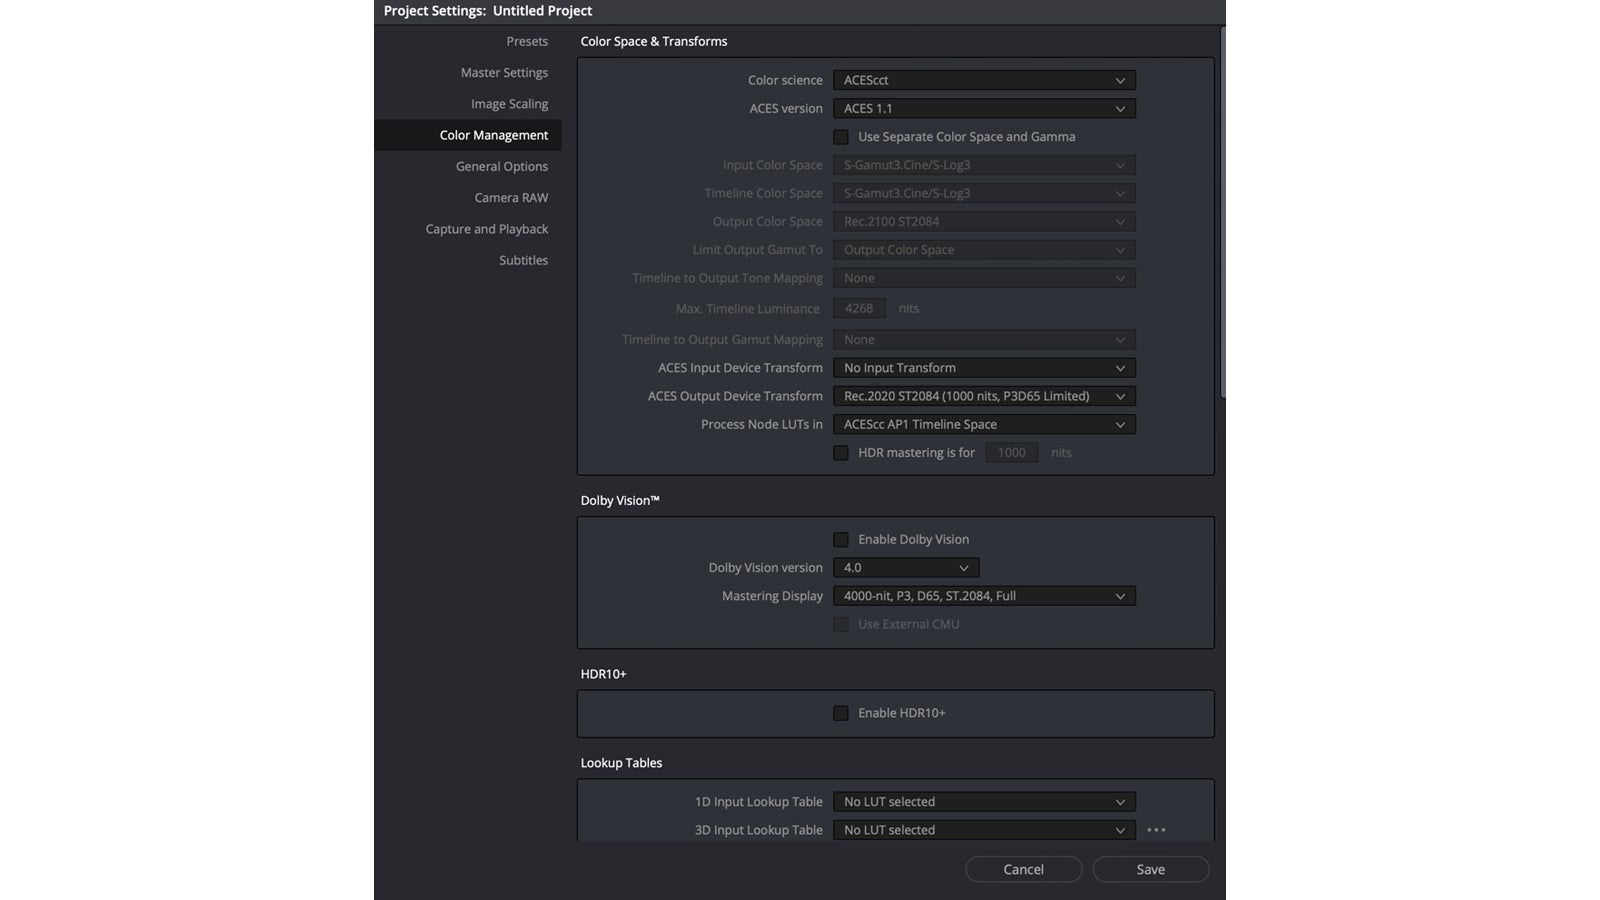
For X-OCN material you should set the input transform to “No Input Transform”. This is very important – do NOT use the “Sony RAW” input transform. This is a legacy transform and no longer provides the optimum transformation for Sony Raw or X-OCN content. When working with Sony RAW or X-OCN, Resolve will read the metadata in the file and correctly set the input transform automatically.
Changing the Raw Decode (for X-OCN and Sony Raw).
By default DaVinci Resolve uses its own process to debayer Sony Raw and X-OCN content at half of its full resolution. This works well while editing or for most grading as the process is fast and needs less processing power than a full resolution decode.
However when you want to truly see the full quality of your content or when you come to render out your project it’s vital that you ensure that the decode is done at full resolution. The easiest way to do this is to make sure that the “Force debayer to highest quality” option is selected in the export video options under the “advanced” settings. Setting this option will force Resolve to use the “Full Res – Resolve” debayer option. However it’s worth noting that there is (in my opinion) an even better quality option.
If you go to the Resolve project settings and go to the “Camera Raw” settings and select “Sony RAW” under the “RAW Profile” tab you will see that you have several options.
If during the editing stage you are struggling to achieve full speed playback then you can try the “quarter-res” or “one-eighth-res” options as these require less processing power but will give a more degraded image.
If you have a fast grading system then you can try either the “Resolve-Full Res” option or the “Sony-Full-Res” option while you do your editing and grading. While I am editing or grading I tend to use the “Resolve-Full-Res” option as this gives a very good quality decode but is still very processor efficient. But once I get to the export stage I will set this to “Sony-Full-Res” as I find there is a small quality improvement over the Resolve decode. However the Sony processor is more processor intensive, so your renders will take a bit longer. If you do use the “Sony-Full-Res” option in the Project Settings, you should NOT select “Force debayer to highest quality” in the export settings as this uses the Resolve process.
What if you have material shot with multiple formats?
Handling multiple formats is easy. You can individually change the input transform for every clip in a project, whether using ACES or DaVinci YRGB Color Managed. In either the Media Room or Color Room you can right click on a clip and select the input transform settings to change the clip’s input transform. In the Media Room it is easy to select groups of clips to change the entire group to a new input transform by first selecting all the clips you wish to change, then right click and go to the input transform setting to change the transform for all the selected clips.
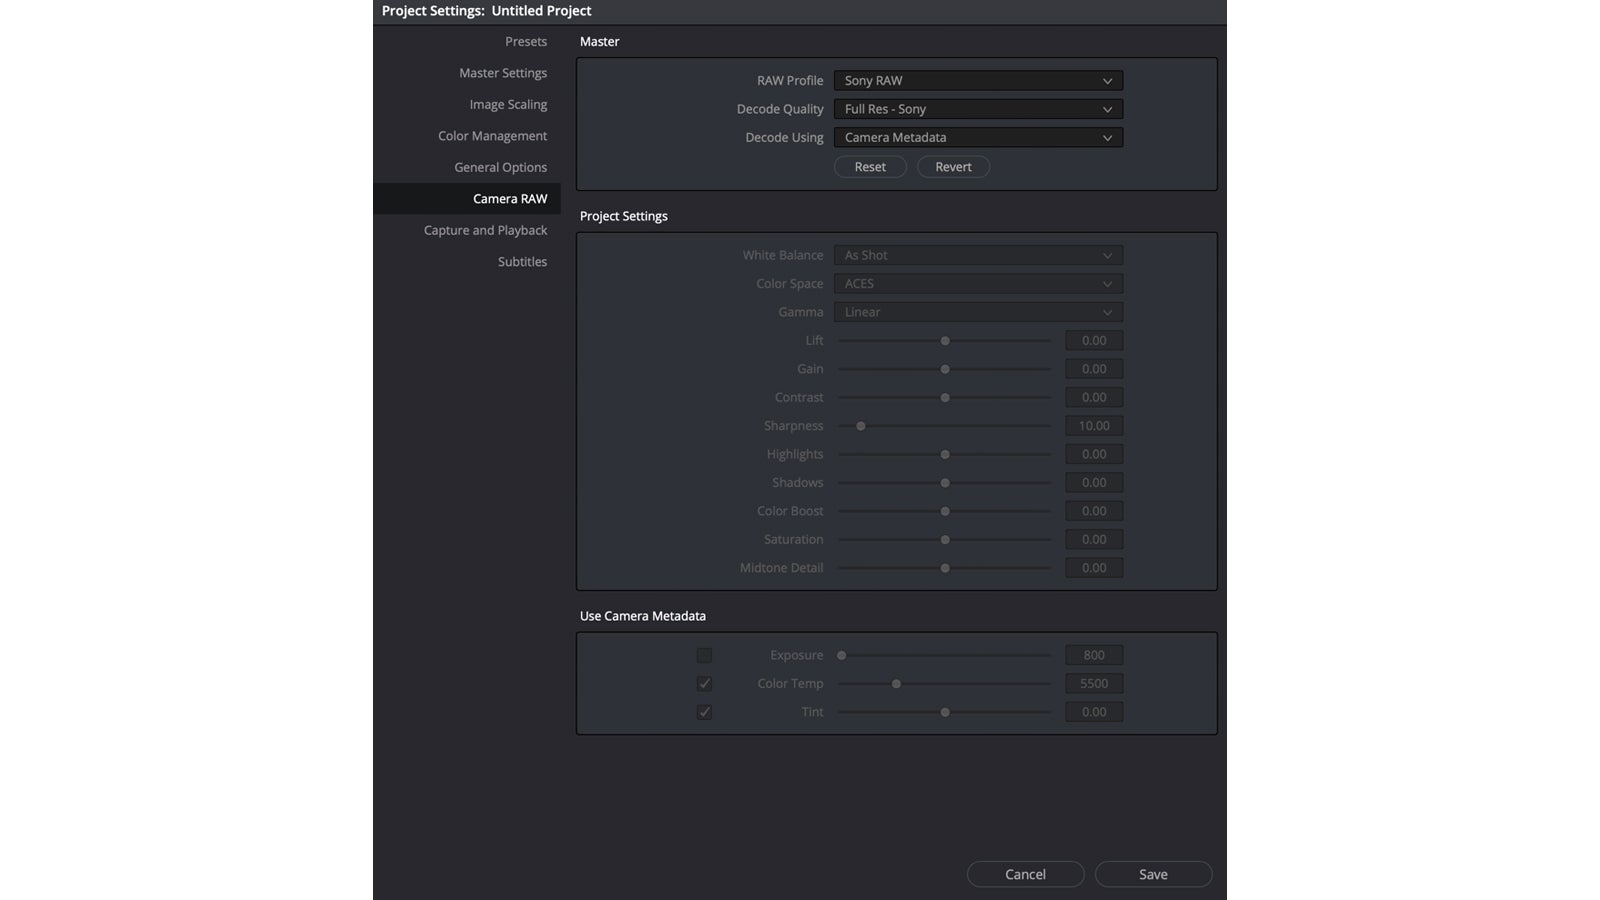
Fortunately, you can flip between the different raw decode settings whenever you want. You do not have to stick with one set of settings for every stage of the edit and grade. In terms of color, I have never observed any difference between the different raw decode settings. However, I do find that I get a very slightly cleaner final result by using the Sony Full Res decode over the Resolve Full Res decode.


