
12-23-2020 - Gear, Technology
Painting the FX6’s Output in Custom Mode Using LUTs
By: Alister Chapman
Alister Chapman is a DP, editor, producer, educator, and is very well versed in technology and all things camera and video related.
To learn more about Alister Chapman, visit his website: xdcam-user.com.
Alister’s recent review of FX6 can be found at this link: https://sonycine.com/articles/the-new-sony-fx6---the-definitive-review-by-alister-chapman/
The FX6 has two different shooting modes, Custom mode and CineEI. The CineEI mode is used when you want to shoot using S-Log3 and in this mode it is normal to add a LUT (Look Up Table) to the viewfinder image or the HDMI and SDI outputs to provide an approximation of how the graded footage will look and to help with assessing exposure.
But did you know that these very same LUTs can also be used in the cameras Custom mode to provide you with an almost unlimited range of different looks? These looks are then what the camera records, so no further grading is needed. In addition, it’s even possible to further modify the look in-camera via the built-in paint settings. It’s an incredibly powerful and useful tool and there is no other camera that I am aware of that offers similar capability.

So how does it work and how do you do it?
When the FX6 is set to the “Custom(709)” shooting mode, by default the camera will load a “Base Look” that uses Sony’s S-Cinetone gamma curve and color matrix. In addition to this default Base Look, the FX6 has three other Base Looks that can be used in the Custom(709) mode, these are “Standard,” “Still,” and “ITU709.” These are similar to Picture Profile 1, PP1 (Standard), PP2 (Still) and PP3(ITU709) found in the PXW-FS5 and many Alpha stills cameras.
In Custom Mode there are two ways to change the Base Look of the FX6. From the Paint menu, you can select either a Scene File with the look you want, or you can directly load the Base Look that you want. But what if you want a look that is different from the built-in ones? In addition to the built-in Base Looks, the FX6 can import 3D Cube LUTs as Base Looks. These imported LUTs can then be used as either a LUT in the CineEI mode or as a Base Look in Custom mode.
Loading user LUTs.
User files and LUTs are loaded from, and saved to, SD cards or CFExpress cards in slot B. The easiest way to start is by formatting a card in slot B as this will place the folders necessary for LUT loading on the card. Then using a computer, place the LUTs you want to use in the following directory:
Private : SONY : PRO : LUT folder. The LUTs should be 17x or preferably 33x cube sLUTs designed for use with S-Log3 and SGamut3.cine.
HINT: Name or rename the LUTs so that you can identify the LUT by the first six characters of its name as only these six characters will be shown in the viewfinder when using the LUT/Look.
With the SD card back in Slot B of the FX6, now go to the main menu (long press of the menu button) and then to the Paint settings, Base Look and select “Import.”

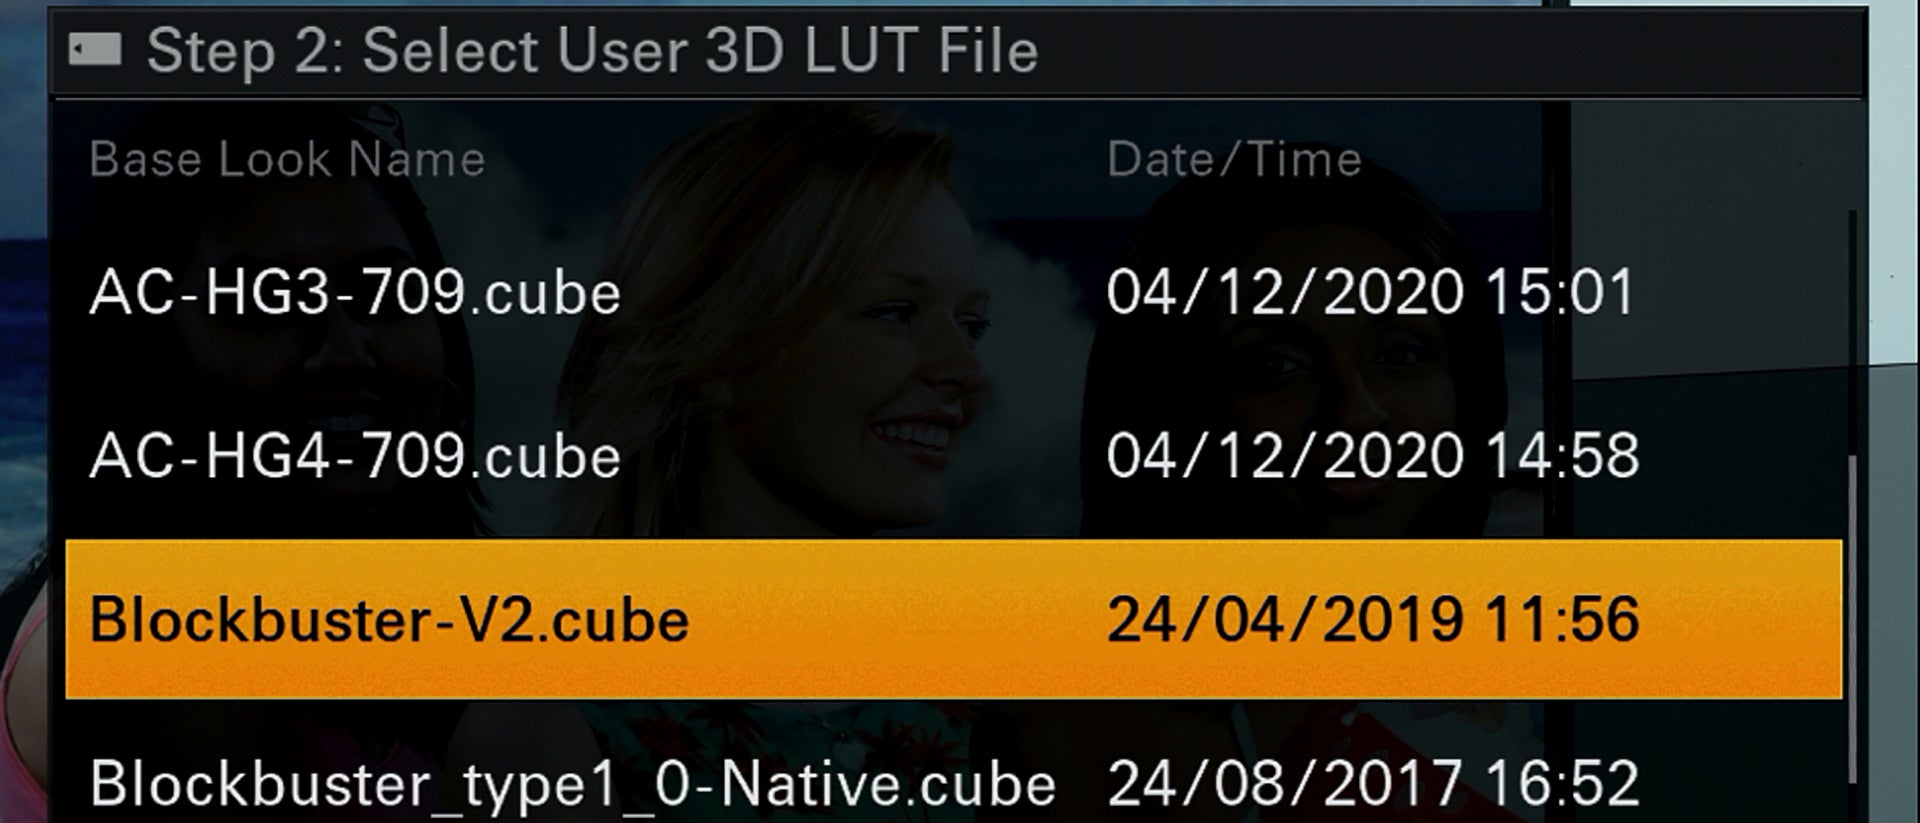
The “Step 1: Select destination” page will be shown and you will see 16 memory locations where you can save your own LUTs/Looks. Chose an empty location to which you will save your LUT.

Now you will go to “Step 2: Select User 3D LUT File.” From this page, select the LUT you wish to use and when prompted, select OK.

Once you have imported the LUTs you want to use into the camera’s memory, next you will need to select the LUT you wish to use as your Base Look. This is done using the “Select” option from the Base Look menu page.


Once selected, the chosen LUT is now applied to the camera’s output and recordings as the Base Look. You will see an indication of the selected Base Look on the right hand side of the LCD.


HINT: When using a LUT to provide a Base Look, the base ISO (0dB gain) in Low Base becomes 800 ISO and in High Base it becomes 12,800 ISO.
If you wish to further modify the colors of the images, you can use the matrix and multi-matrix settings. For most users, the multi-matrix is much easier to use than the matrix. After turning on the multi-matrix, you can select the color axis that you wish to adjust and make modifications using the Hue and Saturation controls. You can adjust a single axis, several axes, or all of them depending on your needs.

It’s also possible to change the black level with the “Black” paint settings and the sharpness of the image with the “Detail” settings. If you do change some of these other Paint settings, you can then save your finished look as a Scene file in one of the camera’s 16 internal scene file memory slots. A Scene File saves the Base Look as well as any further adaptations you have made in the camera’s Paint settings as a single file.
HINT: What’s the difference between a Scene File and Base Look?
A Scene File includes not just the Base Look that you are using but also any other changes or adjustments that have been made to the way the image looks in the paint settings. It is a combination of all paint settings adjustments plus the Base Look. If you save a Scene File, you will be saving the combined Base Look plus paint settings.
The Base Look is just the basic look of the camera, created via a LUT and does not include, modify or apply any other paint settings. Changing the Base Look within a Scene File will not cause any of the other paint settings to change. When you save a Base Look, the only thing saved is the Base Look/LUT.
Using LUTs in Custom mode to change the way the camera looks is very useful. Instead of being limited to just a handful of different presets, you can use almost any LUT designed for use with S-Log3 and SGamut3.cine to define the way the camera looks. There are many hundreds of different LUTs available from many different online sources. For the best results you will want to use 33x LUTs, and the LUT should be designed for full/data range In and with full/data range Out. You can also use the excellent “LUTCalc” application or the online version of LUTCalc to generate your own LUTs. http://cameramanben.github.io/LUTCalc/LUTCalc/index.html
If you would like to be able to use Hypergammas on the FX6, I have created a set of Hypergamma LUTs that can be downloaded from here: http://www.xdcam-user.com/2020/12/hypergamma-luts-for-the-fx6-and-others/
Hypergammas 1 and 2 are designed to be broadcast safe so that the camera’s output remains in gamut for direct-to-air live broadcasts where there won’t be time to legalize the signal later. So these may be useful for those working on live outside broadcasts.


