
12-15-2020 - Gear, Technology
VENICE Gimbal Build Options -DJI Ronin R2 - Variations on a Theme
By: Ryan Campbell
“Can I put the VENICE into a handheld gimbal? Do we need to use the Rialto?”
I get asked this so often that I’m jump starting this article for emergency internet searches. To quickly answer, since your hands are sweating because your Director or DP just asked you: Yes, a Sony VENICE package with AXS-R7 raw recorder can easily fit into a seasoned owner’s DJI Ronin 2, MōVi Pro, or Arri Maxima QL. Prime lenses are fine, zoom lenses will take more consideration.
The cable weight of the Rialto is a bit too heavy for a decent DJI RS1 build, so I would not recommend that. However, DJI’s RS2 came out around the time of the writing of this article, and I feel a Rialto build would be possible with the right consideration to hyper-lightweight lenses and accessories. Earlier I noted, “seasoned,” because several of the items needed for the build have to do with additional gimbal-specific accessories that are common to an owner’s kit, but that aren’t included, right out of the box or with basic rental packages.
If there’s not a seasoned owner or dedicated tech who is well experienced with gimbals, then I highly encourage you to hire one. If you work with them in advance on the shot you’re trying to accomplish, they’ll be able to guide you and offer advice on the appropriate build and any equipment limitations.

My previous article for this website discussed Sony Rialto builds, and if you’re unfamiliar with that system or its capabilities, I encourage you to read that article, it’s a great supplement to understanding the topics covered here. For the rest of this article, I will lightly graze just a handful of the innumerable combinations for some common electronic gimbals and placing a full-sized VENICE into them. The only right way to build, or use, any camera setup is tailored for that specific shoot or shot. Sometimes you will get thrown a curve ball by budget or limitations of equipment availability and you have to work with what you have, so hopefully this article will provide a good starting-off point for concepts, decisions and reasoning behind those decisions, that will get you on your way.
Electronically stabilized gimbals have been around for a bit now in the consumer, prosumer, and professional world. However, I still have A-list crew inquire with me wanting clarity on exactly what they are.
In short gimbals are defined as “…a pivoted support that allows the rotation of an object about a single axis. A set of three gimbals, one mounted on the other with orthogonal pivot axes, may be used to allow an object mounted on the innermost gimbal to remain independent of the rotation of its support.”

VENICE and Fujinon 18-85 zoom lens in a Shotover gimbal mounted to helicopter
In the cinema world, they can be used handheld as a single operator, handheld with a moving-platform operator to move it through a space while a camera operator frames the image, or it can be body mounted, car mounted, cable line mounted, on jibs and cranes, on drones, on RC cars, and even tiny ones can ride on animals. Gimbals are a very diverse tool that can create compelling and dynamic shots when used correctly. With on set protocols and concern for COVID-19, gimbals are also just being used in studio mode as a remote camera head on a tripod or dolly to help separate the operator from the talent.
For going handheld in the VENICE’s weight range, I most commonly come across the DJI Ronin 2 and the MōVi Pro. In this article I’m going to focus on DJI’s Ronin 2. I will follow up this piece by covering the MōVI Pro and XL in another particle. To be extra fair, in the world of smaller remote heads, a full-size VENICE can also sit easily inside an ARRI Maxima, ARRI SRH-3/SRH-360, Shotover G1, Libra Mini, Scorpio Micro, etc. All different style remote heads with different applications and budget ranges.
Most of my jobs require the option for the camera to be able to be pulled off the gimbal and be mounted to whatever else in minimal reset time. With these setups, I prefer that the camera build is one piece and easily able to transfer to another platform. For both of these reasons and for studio mode, I try to mount as much as a I can to the body rather than an outer ring. The DJI Ronin 2 can handle the weight of these types of easy setups. This can extend your gimbal’s physical length via the Ronin 2’s natural arm extensions, so you might find yourself prefering the Rialto in order to squeeze into tighter spaces.

Cinemilled Upper Tilt Arm Extensions for DJI Ronin 2 Gimbal
For instance, if you have the Ronin mounted in flashlight mode on the end of a jib and you’re poking into a car window, then the Rialto is probably the better setup for the job. There are also some operators who have more strength in certain parts of their bodies than others and they may prefer to carry more weight on their backs and less on their arms.
With most moves expected from handheld gimbals, while you can definitely use a Rialto to lighten the load on your arms, the weight isn’t completely lost since you’ll still need to carry the VENICE on your back, which will also increase the overall physical space you take up. This can cause your moves to be more tedious on tight sets since you don’t want to upset the VENICE on your back. The overall weight limit concerns for any gimbal has several factors to consider, and for a number of good reasons. That’s a topic of itself, but rather than doing a deep dive into that, just know that you do have the option to either put the whole VENICE and AXS-R7 raw recorder, or just the Rialto, on the gimbal.
Overall for these builds, I took off the aftermarket VENICE body plates and just used DJI’s 15mm riser for rails. Cinemilled makes several Ronin 2 accessories and with the VENICE’s natural mounting points covered by the gimbal’s contact points, these items will help when you find yourself needing places to mount accessories. All accessories can be powered by just the Ronin itself.

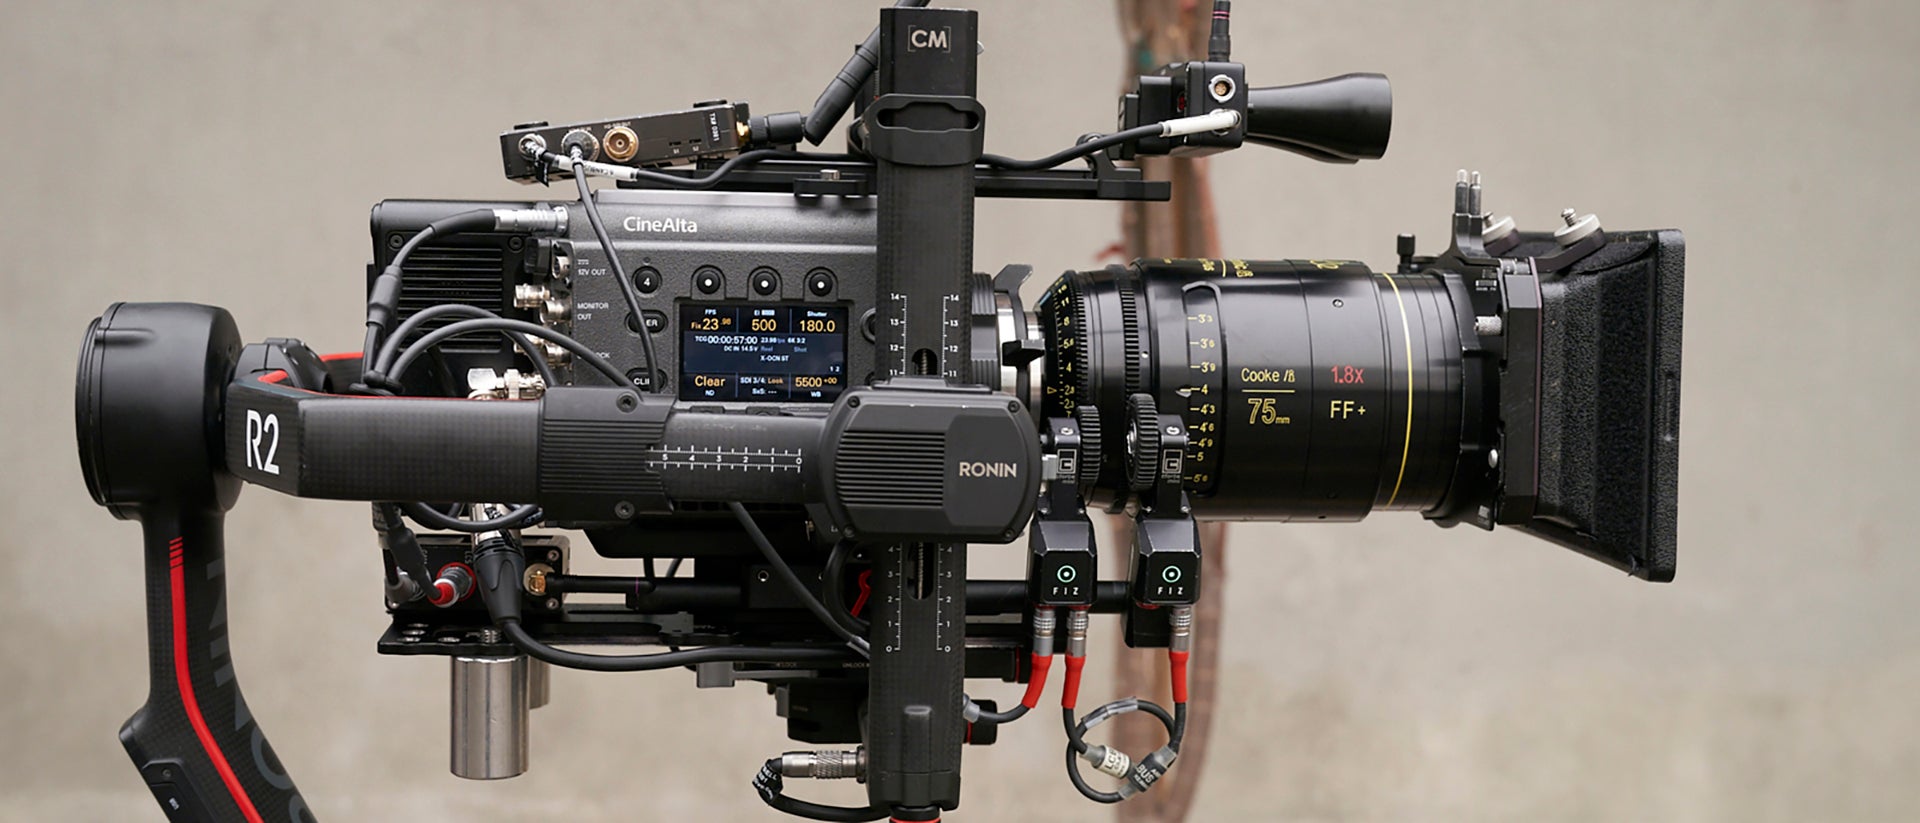
Cooke lens build with accessories visible
If you’re a Ronin 2 owner or tech, this is what you should have ready for most of your VENICE builds:
- 6x DJI TB50 Batteries (At a min, more if no AC power is around for you to rotate battery charging or if expecting cold weather)
- Ignite Digi Ronin 6-pin to 4-Pin XLR (if in a pinch for time, you can also just cut one of your other spare power cables [looking at you DC barrel] or get the Ronin 6-Pin power cable that just has leads, and solder on your own 4-pin XLR)
- P-Tap to 4-Pin XLR (backup to the Ronin 6-pin to 4-Pin XLR)
- DJI Ronin 2 P-Tap Breakout
- DJI Ronin 2 15mm Focus Rod Mount
- Lightweight 15mm rails
- Cinemilled Upper Tilt Arm Extensions for Ronin 2
- Cinemillled Extended PRO Lower Dovetail for Ronin 2
- Cinemillled Extended PRO Upper Dovetail for Ronin 2
- Cinemilled Rod Support for Dovetails 60mm LWS
- Cinemilled Pan Counterweight Mount for Ronin 2
- Assortment of Counterweights from Cinemilled

Detail of Cooke lens build
From there, besides being ready for several other cameras, you’ll have a good starting off point for majority of VENICE builds. This is a complete list of what we put on the Ronin 2 this time:
- DJI Ronin 2
- Sony VENICE
- Sony AXS-R7 External RAW Recorder
- Ronin 6-pin to Right-angle 4-Pin Power Cable
- DJI Ronin 2 15mm Focus Rod Mount
- DJI Lightweight 15mm rail
- Cinemilled Upper Tilt Arm Extensions for Ronin 2
- Cinemillled Extended PRO Lower Dovetail for Ronin 2
- Cinemillled Extended PRO Upper Dovetail for Ronin 2
- 2x Cinemilled 2in Counterweights (each 326g/11.5oz)(only for Cooke)
- ARRI AMC-1 Motor Controller
- AMC to 3-Pin R/S Cam Cable
- 2x LBUS Cables
- 2x ARRI cforce mini
- 2x Ronin 6-pin to 2-pin Lemo power cable
- Paralinx Tomahawk
- Focusbug Cine RT System
- 2x Cameo Swivel Mounts
- ARRI LMB-5

Hawk V-Lite 80mm Anamorphic build
And with that we were able to easily use the following lenses:
- Cooke 75mm Anamorphic/i 1.8x FF+ T2.3 (3.5kg/7.7lbs)
- ServiceVision Scorpio 100mm Anamorphic T2 (2.2kg/4.8lbs)
- Hawk V-Lite 80mm Anamorphic T2.2 (2.3kg/5lbs)
- Zeiss Supreme Prime Radiance 85mm T1.5 (1.4kg/3.1lbs)
Hawk Anamorphic build, view from below.

ServiceVision Scorpio 100mm Anamorphic build
To reiterate, there are several factors to consider, with its healthy weight limit and in terms of how the camera will be used for the shot. After all, for any gimbal, it would be terrible to bend one of the motor shafts or shear the mount altogether. We went beyond the healthy limit of the Ronin 2 for the sheer joy of, “will it work?” I would recommend this in a studio-mode type situation on a tripod or dolly. Also, with a build like this on the R2, your whip pans are going to have to be slower to account for the inertia.

Zeiss Supreme Prime Radiance 85mm build

Zeiss Supreme Prime Radiance build, view from below
Below is the VENICE/Raw Recorder with a Fujinon Premista 28-100 T2.9 Large-Format Cine zoom lens with ARRI UMC-4/CLM-3 motor combo. It took a fair number of counterweights and I needed the Cinemilled Pan Counterweight Mount due to lens circumference with motors and the whole build’s needing to be actually shifted forward. It worked though, and because of the shift forward there’s even enough clearance in the back to clear the roll bar for a full range of motion. This is a great example of when you’d possibly want to consider using the Rialto system instead to save some weight for better gimbal performance.

Fujinon Premista build
My goal with this article is to conclusively answer an often-asked question, “Will a full-size VENICE fit?” In a world where your tools can make or break the job, it’s good to know what options you have to better communicate your vision. Hopefully this article has put you at ease and given you some inspiration for your build. The Sony VENICE fits.
Special thanks to Keslow Camera for gear support.
About the author:
Ryan Campbell has been working in film, and framing images, for 15 years. He's worked with the who’s-who of the industry on everything from commercials, features and TV, to new media and scientific experiments. If you've had a shot or situation and your initial question was, “How should we...?” Ryan is potentially the one who, working modestly behind the scenes, provided the solution for your producers, directors, DPs, camera operators, underwater operators, drone operators, ACs, DITs, gaffers and key grips.

Premista build with counterweights


